Morecambe Tile Cleaning

Morecambe Tile Cleaning

Welcome to my Work History archive where you will find examples of the cleaning and renovation of tiles carried out in Morecambe.

Mouldy Ceramic Tiled Bathroom Refresh Hest Bank

Renovation of a Mouldy Ceramic Tiled Bathroom in Hest Bank Lancaster

We were recently asked to refresh the Ceramic Wall Tile and Grout in the bathroom of a property in Hest Bank which is a small village on the coast North of Morecombe Bay and Lancaster. Ceramic tiles are glazed so very easy to keep clean however the main issue wasn’t the tiles themselves but the grout and silicone sealant which over time had turned black in some areas due to mould and staining.

Ceramic Tiled Bathroom Before Cleaning Hest Bank

This is not uncommon problem in small bathroom were a general lack of ventilation provides the moist conditions that mould thrives in. Additionally, the top layer of grout is slightly porous and having a rough surface it does attract dirt over time.

The only real solution to this problem is to improve the ventilation however you can minimise the problem by opening windows during showering and leaving the bathroom door open afterwards to improve cross ventilation. In the meantime, however you can keep on top of the problem with a little renovation work.

Ceramic Tiled Bathroom Before Cleaning Hest Bank

Deep Cleaning Grout in a Ceramic Tiled Bathroom

The renovation started by scrubbing the grout and sealant with Tile Doctor Duo-Clean which is a purpose made bathroom tile and grout cleaner designed to tackle mould and staining. It also kills mould spores that are still prevalent and can respawn resulting in more mould. Once done, I always like to leave any remaining product with the client for this reason so they can re-treat the problem in the future.

Scrubbing with Duo Clean worked well but some of the staining was simply so deep to remove so the only solution was to scrape it out of the grout joints with a flat blade and Stanley Knife and then re-grout. The silicone sealant around the bathtub was very badly affected by mould and had to be completely stripped out using the same method.

Grout Sealing a Ceramic Tiled Bathroom

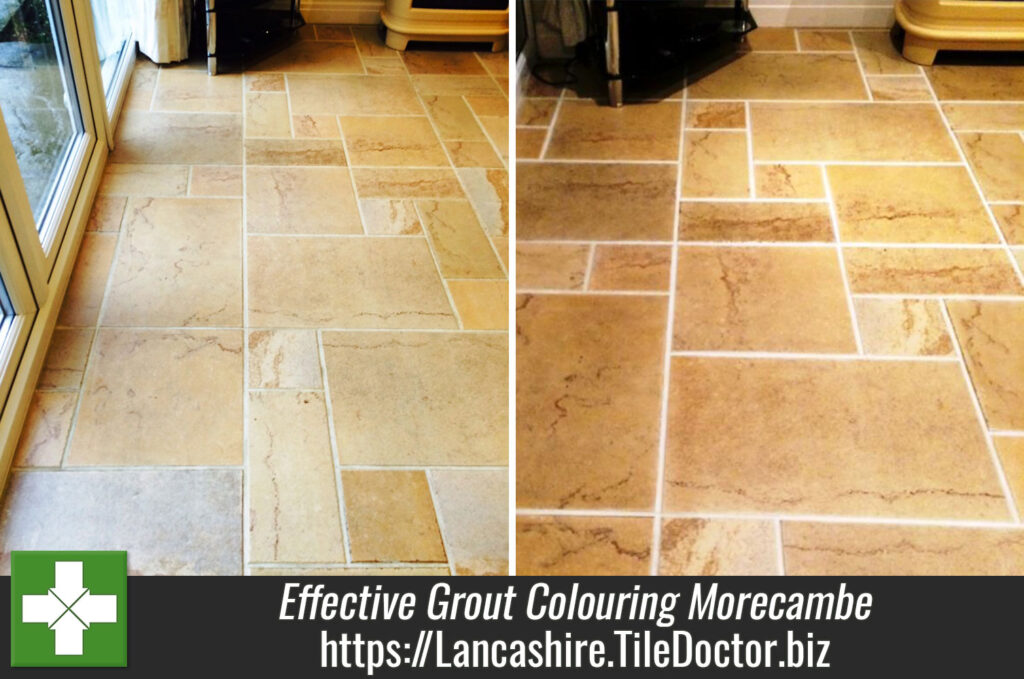
Once the treatment was completed the tile and grout was dried off thoroughly and then a coat of Tile Doctor Wall Tile and Grout Sealer was sprayed onto the grout to help protect it from mould forming going forward. This product is very easy to use and adds a protective layer over the surface of the grout to prevent the mould spores or limescale attaching itself. It also makes the tile and grout easier to clean afterwards.

Ceramic Tiled Bathroom After Cleaning Hest Bank

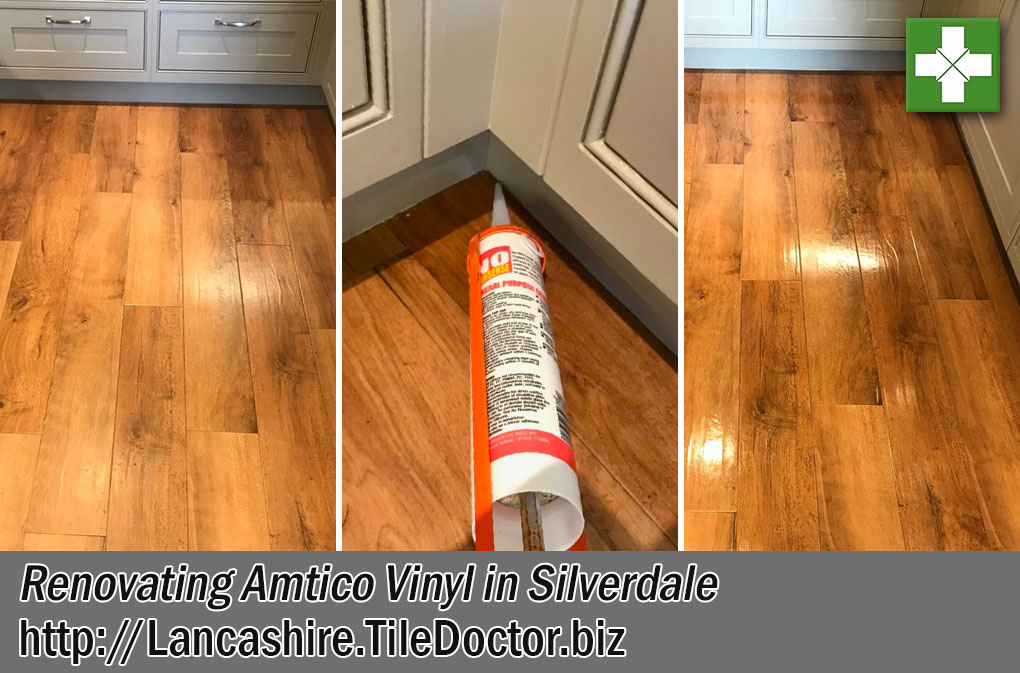
Once this was done a fresh mould resistant and waterproof brand of silicone was applied to the joints between the tiles, and the bath and sink. With the fresh silicone in place and the tile and grout renovated the bathroom looked almost new and much more inviting.

For aftercare I recommended using Tile Doctor Aqua-Pro which is designed for cleaning bathroom and shower tiles, you will find this product is a mild but effective cleaner that will promote the length of the sealer applied earlier. Many tile cleaning products are bleach based and these will strip the sealer off, so it is well worth bearing that in mind when purchasing household cleaners.

Ceramic Tiled Bathroom After Cleaning Hest Bank

The client was very happy with the work we had carried out and were no longer embarrassed to allow people to use their bathroom.


Professional Restoration of Ceramic Tiled Bathroom in Lancashire

Renovation of a Mouldy Ceramic Tiled Bathroom in Hest Bank Lancaster Read More »

Flagstone Floor Before After Restoration Morecambe

Old Bitumen Covered Flagstone Floor Restored in Morecambe

Late last year I was asked to survey a Flagstone floor in Morecambe which appeared to be beyond restoration. The floor had a long history and at some point in its past was covered with carpet which had been secured onto self-levelling cement with bitumen. All the companies that had visited before we got there said nothing could be done with it and recommended replacing the carpet or covering it with vinyl. As mentioned, it had been previously covered with carpet however this is an old floor and damp had been rising though the floor causing the carpet to rot. My client didn’t want to entertain that as a solution and so kept on looking for a company that could restore the stone.

Flagstone Floor Before Restoration Morecambe Removing Self-Levelling Compound and Bitumen from Flagstones in Morecambe

Old houses like this one do not have a damp proof membrane installed under the floor and moisture rising through the stone needs to be allowed to evaporate or you will find damp spreads outwards towards the walls leading to rising damp. In this case I suspect the bitumen which acts as a water barrier had either failed or damp was coming up the wall and into the carpet and underlay. Certainly, in our experience, if you have an old natural stone floor like this it is best not to cover it with anything more than a rug.

Having inspected the floor, I recommended restoring the appearance of the flagstones by grinding the surface down a few millimetres to reveal new stone. We can do this using several different grades of coarse diamond encrusted diamond pads, a process we call Milling.

Cleaning/Repairing a Flagstone Tiled Hallway Floor

After being given instructions to restore the floor we returned on the schedule date and began by removing as much of the loose cement and bitumen by hand using hand tools.

Removing Self-Levelling Compound and Bitumen from Flagstones in Morecambe

milling the floor using a very coarse 50-Grit pad fitted with DRB segments (Diamond Resin Blocks). Cutting the surface of the stone like this is hard work and requires the use of a weighted floor buffer to apply the pads. The process is lubricated with water and generates a lot of slurry which is extracted off the floor with a wet vacuum. The 50-grit pad was followed with a 100-grit DRB pad and then 200-grit DRB pad which start the slow process of refining the surface. It’s a two-man job so I brought a colleague along, whilst one was milling the other could take a rest and help with the clean-up.

The milling did a great job of removing the Black Bitumen, Self-Levelling compound and old paint revealing the true beauty ` and colour of the Flagstones, in fact the stone had quite a variance of colour which was lovely to see coming through. Half the pointing was missing so after milling the stone we moved onto replacing what was left of the old pointing and replacing with a modern breathable product.

We called back the next day to finish the stone cleaning by further renovating the stone surface using finer grades of diamond encrusted burnishing pads of 400 and 800-grit. Again, you need to water to lubricate the process and rinse the slurry of the floor with water after each pad, then extract with a wet vacuum. This does leave the floor damp, so once we had finished it was left to dry out for a few days, old floors without a damp proof membrane can take longer to dry and especially so in the Winter months.

Flagstone Floor After Restoration Morecambe

Sealing a Flagstone Tiled Hallway Floor

Returning a few days later the stone was first checked with a damp meter to check it had dried out before sealing. The moisture readings were fine, so it was then sealed with a couple of coats of Tile Doctor Colour Grow which penetrates deep into the stone protecting it from within and enhancing the natural colours in the process.

Flagstone Floor After Restoration Morecambe

The flagstone floor was completely transformed by the process and our client was over the moon with the result. In fact, they have asked us back to do the same in the Kitchen as the vinyl in there has since been torn up and revealed the same stone.


Professional Restoration of a Flagstone Tiled Hallway in Lancashire

Old Bitumen Covered Flagstone Floor Restored in Morecambe Read More »

Amtico Vinyl Floor Before After Cleaning Silverdale

Renovating Amtico Vinyl Flooring in Silverdale

This client from Silverdale had called us over to renovate their 12-year-old Amtico vinyl floor that runs from the back door, through the kitchen and then over to the dining room. Although modern brands of Vinyl are much more durable than in the past, they do require a sealer to protect the surface from marking, enhance the colour and general appearance. This floor had not been retreated for twelve years and so its appearance had become dull and patchy in places.

Amtico Floor Silverdale Before Cleaning Amtico Floor Silverdale Before Cleaning

Tile Doctors are trained in the renovation of all types of Tile and this includes Vinyl flooring with which we use the same methods and equipment to strip the old sealer away and replace with new. Vinyl if a manufactured material so the products we use are different and Tile Doctor supply a Stripper and Sealer which are designed for the job.

Cleaning and Stripping an Amtico Vinyl Floor

We started by applying a clear mastic silicone around the base of the MDF panels in the kitchen, we would be using water in the cleaning process, so this was done to prevent any moisture being absorbed via capillary action which would ruin the panels.

Amtico Floor Silverdale Prep Before Cleaning

Once the area was prepped, we started stripping the old sealer off the Amtico using Tile Doctor Vinyl Strip diluted with five parts warm water. The solution was gradually applied as a slow speed buffing machine fitted with a black scrubbing pad was run over the surface. The soil generated was rinsed off the floor with water and then extracted using a wet vacuum

The floor was then steam cleaned to remove any excess product from the Vinyl, as well as making sure the floor area was as clean and dust free as possible before moving onto the next step of applying a fresh sealer.

Amtico Floor Silverdale During Steam Cleaning

The Amtico would need to be dry in order to seal it so as much moisture as possible was removed using the wet vacuum and then left to dry for about an hour with air blowers in place. This is very important as applying sealer to a damp Vinyl floor can cause issues with the bonding process resulting in the affected area turning white and feeling sticky.

Amtico Floor Silverdale Drying After Cleaning

Sealing Amtico Vinyl Flooring

Once I was satisfied the floor was dry three thin coats of Tile Doctor Vinyl Shine applied to the Amtico leaving the floor to dry for up to forty minutes between coats. Thin coats are the key, if it has a blueish tinge to the seal (what we call pooling) then the coat is too thick and needs to be thinned out which is best done with a paint pad. If the first coat is patchy, we just let it dry and then add a second coat to which will even out the patchiness.

Amtico Floor Silverdale After Cleaning Amtico Floor Silverdale After Cleaning

Tile Doctor Vinyl Shine is a modern high solids polymer floor seal and polish designed to protect and enhance the appearance of Vinyl floor tiles. It works well on all types of Vinyl including Amtico and Karndean and the optional third coat adds a super high gloss finish.

The floor looked great and really lifted the room. The client was very happy with the result and was kind enough to leave the following feedback.

”Very professional, efficient service, with an excellent end result. Very clean and tidy, punctual and made sure the job was finished to a high standard. Very pleased with the finish on my Amtico floor. – Sheila and Kevin S”


Professional Clean and Seal of an Amtico Tiled Kitchen in Lancashire

Renovating Amtico Vinyl Flooring in Silverdale Read More »

Floor Damaged Limestone Fireplace Hearth Before and After Cleaning

Limestone Fireplace Hearths Stained by Flooding Rejuvenated in Morecambe

Morecambe is a large town on Morecambe Bay in Lancashire, and is a tourist hotspot within the region – particularly amongst beach goers during the summer. However, due to its location of being right next to the coast and near to the River Lune, Morecambe is an area which is commonly affected by flash flooding. Just last year there were several episodes of severe flooding.

This flooding has a big impact on houses and businesses – the damage water can cause can come as quite a surprise if you have not experienced it before. I recently visited to a business in Morecambe which had been affected by flooding. The business was, in fact, a fireplace showroom and a pair of the Limestone fireplace hearths on display had been stained by the water.

Floor Damaged Limestone Fireplace Hearth Before Cleaning Floor Damaged Limestone Fireplace Hearth Before Cleaning

We were asked to remove the water marks left by the flooding. One of the hearths has been in use as a test model, with a coal burner installed, and it hadn’t been cleaned properly in some time. As you can imagine, there were more problems than just the water stains to overcome! Both hearths would require a deep clean and fresh seal.

Cleaning Stained and Dirty Limestone Fireplaces

To begin, we applied Tile Doctor Oxy-Gel to the hearths. This product is a specially formulated, alkaline-based degreaser and cleaner. As it comes in a gel form, not a liquid, Oxy Gel can be brushed into vertical surfaces and left to soak, without risk of it either disappearing into the Limestone or, even worse, trickling down the side of the surface. We would not want it coming into contact with the carpet, for instance.

We left the Oxy-Gel to dwell for a short period on one hearth while we worked on the other, applying the same treatment. After around twenty-five minutes we rinsed off the gel with clean water and then extracted any excess moisture with the use of a wet vacuum.

This process did a good job of cleaning the Limestone, but more work was required to restore its appearance, so the hearths were polished using a set of diamond encrusted hand held burnishing blocks. We started with the coarsest block (50 grit) and rubbed the stone with a bit of added water as lubrication, before wet vacuuming away the excess residue. This process was then repeated with progressively finer blocks (100, 200 and 400 grit), and the hearths were given a final rinse with fresh water.

There were some odd ring marks on one of the Limestone hearths that we couldn’t remove. Thankfully, the owner put our minds to rest on this problem, as he said they were there when he initially purchased the stone over 20 years ago. They had been covered with dirt ever since and the customer was surprised, but not shocked, to see them again. I suspect that these marks were caused by the natural mineral deposits within the stone. These should not be seen as a stain, but just a characteristic of the stone – and no amount of cleaning will get these marks out.

We would normally seal a light-coloured stone like this with Tile Doctor Ultra-Seal, as this no-sheen product helps to retain the natural patina of the stone. Alternatively, if we wanted to darken the tone of the Limestone, we would apply Tile Doctor Colour Grow, which is a colour-intensifying, impregnating sealer. Two coats of either sealer would suffice, in this case despite being very pleased with the results of the cleaning, the customer decided that he wanted to take care of sealing of the stone himself.

Floor Damaged Limestone Fireplace Hearth After Cleaning Floor Damaged Limestone Fireplace Hearth After Cleaning


Water Stained Limestone Fireplace Hearth Restoration in Morecambe

Limestone Fireplace Hearths Stained by Flooding Rejuvenated in Morecambe Read More »

Mosaic tiled worktop after grout colouring

Grout Colouring and Cleaning of a Mosaic Tiled Kitchen Worktop in Silverdale

Tiled kitchen worktops work really well, but just like any other kind of tiled surface they will need regular cleaning and maintenance to keep them looking great. Kitchen worktops in particular can fall into poor condition quickly when exposed to all manner of dirt and stains resulting from food preparation, with the grout lines often suffering the most which if you have tiles in your shower is a problem I’m sure you will be familiar with.

Mosaic tiled worktop before grout colouring
The grout lines on this Mosaic tiled kitchen worktop had become discoloured following years of exposure to soaps and washing up liquid from the nearby sink, as well as, most likely, food and drink spillages. The property was in the picturesque village of Silverdale, Morecambe Bay, and the owner had decided it was time to have the worktop professionally refreshed. This was a job that would only take a few hours to complete, and would involve both grout cleaning and recolouring.

Mosaic tiled worktop before grout colouring

Cleaning and Recolouring Dirty Grout for a Mosaic Worktop

Before beginning the restoration, I had to decide upon the best method. I realised that if I took out the grout to replace it completely I may have dislodged or even damaged the tiles – especially considering that they are at least 30 years old and give the age of the tiles it would be difficult if not impossible to find replacements if they were damaged.

As a result, I opted to clean the tiles and grout using Tile Doctor Oxy Gel. This product is a strong alkaline-based cleaner in gel form designed to break down dirt and grime, including soap scum and mildew stains. While it can be used on both horizontal and vertical surfaces, it is particularly suitable for the latter as the gel is able to dwell for a long time without running down the wall. Oxy Gel proved to be very effective in restoring the grout lines to top form, but I chose to follow by steam cleaning the area to get rid of any bacteria.

Mosaic tiled worktop during grout colouring
To finish the restoration, I recoloured the grout lines using our fresh White grout colourant – one of 10 available colours. Tile Doctor’s grout colourant seals and rejuvenates existing grout joints, and is equally effective for interior or exterior applications, including bathrooms and kitchens. The colourant was left for a little while to cure, before I polished off the excess with white sponge pads.

Mosaic tiled worktop after grout colouring
The result was a quick and effective transformation for the Mosaic tiled kitchen worktop that left the customer very happy!

Professional Mosaic Tiled Kitchen Worktop Restoration in Lancashire

Grout Colouring and Cleaning of a Mosaic Tiled Kitchen Worktop in Silverdale Read More »

Grout Colouring Morecambe 2 After

Tiled Floor Restored In Morecambe With Quick And Effective Grout Colouring

Details below of a Grout colouring job I recently completed at a house in Morecambe. In this instance, the grout had become stained, and my client was no longer happy with it.

There are a number of reasons grout can lose its appearance including the build-up of mould in damp and unvented areas, staining from liquids accidentally spilt on the floor and surprisingly if you have a coloured grout it can lose its colour due to the bleach found in common types of household cleaning products. Grout contains lime which is acid-sensitive and will react to acidic cleaning products so for general cleaning do use a pH Neutral Cleaning product.

Grout Colouring Morecambe 1 Before Grout Colouring Morecambe 2 Before

To tackle the stained grout I first tried Tile Doctor Pro-Clean which can be used at different levels of concentration to increase its potency. In this case however when this grout dried it went back to being patchy so then the only answer was to restore its appearance using a Grout Colouring kit.

Grout Cleaning and Colouring

To form a better bond with the Grout Colourant I first treated the grout with a Tile Doctor Pre-Treat Cleaner, which is very slightly acidic and effectively etches the grout. If you have a particularly acid-sensitive stone tile (Limestone, for example), it is recommended to use Tile Doctor Oxy-Pro cleaner instead as this won’t upset the stone, yet still clean the Grout ready for colouring.

Once the Grout had dried (which is some cases can be several hours), I applied a thin coating of the Grout Colourant, as a thin coat dries quicker and provides a more even finish. A second coat was then added, before polishing off the excess from the edges of the tiles. After about half an hour the Grout Colourant was dry to the touch (at this stage you should be able to walk on the floor). Note that if you are Grout colouring a wall tile in a shower cubicle, it is best to leave the area for 24 hours before using the shower.

Grout Colouring Morecambe 2 After Grout Colouring Morecambe 2 After

As you can see from the photographs, the result was very effective, and needless to say my client was very happy with the rejuvenated appearance of her grout.

Professional Grout Cleaning and Colouring in Lancashire

Tiled Floor Restored In Morecambe With Quick And Effective Grout Colouring Read More »

Milling Blue Lias Limestone After

Milling and Polishing Blue Lias Limestone tiles in Silverdale

The owner of this Blue Lias Limestone tiled floor in the village of Silverdale was not happy with the installation which had occurred two years earlier and several attempts by the Builder/Tiler to put it right had not resolved the problem. Basically the floor was not flat and had several raised tile edges resulting in what is known in the trade as a Lippage problem. Fortunately natural stone can be ground down to remove this issue.

Milling Blue Lias Limestone Before Milling Blue Lias Limestone Before

Milling and Polishing Limestone Tiles

To level a stone surface such as Limestone you need to use a special grinding disc formed of diamond segments that is attached to a heavy rotary machine and run over the tiles until the desired effect is achieved, in our case up to 4mm of Limestone had to be removed in some areas to ensure the tiles were flat. Once this was done the floor was rinsed down to remove the slurry that was generated from the milling process and also scrubbed clean with a dilution of Tile Doctor Pro-Clean with particular attention paid to the grout lines.

Milling Blue Lias Limestone Milling Pad
Once the surface was level the next step is to burnish the Limestone tiles and restore the polish which is done via the application of a different set of diamond encrusted pads which come in a set of four. You start with a coarse stripper pad with water to strip back the surface and then move onto the finer pads to polish the floor.

Sealing Limestone Tiles

Being a natural stone the tile needs protecting from contaminates which can stain and this is especially relevant in a kitchen. So the next step was to wait for the floor to dry and then seal it using two coats of Tile Doctor Colour Grow which is an impregnating sealer that soaks into the pores of the stone. Colour grow is a great sealer to use on natural stone as not only does it offer good stain protection but it also brings out the colours in the stone.

Whilst sorting out the floor we noticed that the skirting boards and kitchen units had not been sealed to the tile with silicone to prevent water ingress that could damage the wood so to finish the job off we sealed in-between.

Milling Blue Lias Limestone Tile Silicone
The customer was extremely pleased with the end results as they were considering taking it all up and starting again, and left the following feedback on the Tile Doctor website.

We’re absolutely delighted with the result. The floor, of blue limestone, was laid unevenly and unpolished. Russell and Heidi removed the lippage, polished and buffed the stone and sealed it properly, so it now looks the way it ought to have looked in the first place. It was certainly not cheap; but it was considerably cheaper than having a new floor laid – and it was done in three days without putting the kitchen completely out of action.

Milling Blue Lias Limestone After Milling Blue Lias Limestone After


Uneven Limestone tile problems resolved in Lancaster

Milling and Polishing Blue Lias Limestone tiles in Silverdale Read More »

Shower Cubicle Silverdale After

Cleaning a Ceramic Tiled Shower Cubicle in Silverdale

This ceramic tiled shower cubicle was installed at house in Silverdale, you can see from the photographs below that there was staining from the chemicals in domestic products and there was also a build-up of mould on some parts of the grout and silicone sealant. Mould can get a grip here due to a porous top layer and this is especially a problem in the UK where bathrooms tend to be small with inadequate ventilation.

Shower Cubicle Silverdale Before Shower Cubicle Silverdale Before

Cleaning Tile and Grout

The ceramic tiles and grout was treated using Tile Doctor Oxy Pro which is a ready to use tile and grout shower cleaner that comes with a trigger spray attachment which allows the cleaner to mix with air making it lighter and allowing it to stick to vertical surfaces. It was then worked in using a stiff scrubbing brush by hand before being rinsed off with water; this process was repeated a number of times until we had managed to clean all the areas and then left to dry.

Unfortunately it’s not possible to remove mould from silicone sealant, the only solution is to have it stripped off and replaced. Once this was done the edges were cleaned up and fresh mould resistant silicone was applied.

It’s worth mentioning at this point that silicone will last longer if the residue from soaps, shampoos and body washes etc. are rinsed away with clean water after having a shower as it’s the chemical and not the water that damages the silicone in the first place.

Shower Cubicle Silverdale After Shower Cubicle Silverdale After

The results are plain to see and my customer was very satisfied with the work.

Prevention is always better than the cure and another tip you might find useful is to improve ventilation which is a major problem with draught free modern housing fitted with insulation and double glazing, if this is not possible try leaving your shower room door wide open after having a shower. Another option is to look at installing a ventilation and heat recovery system which extracts the hot air from kitchens and bathrooms through a heat exchanger to warm up fresh air from outside and recycles it back into the house.

Cleaning and Sealing a Slate Tiled Shower room in Lancashire

Cleaning a Ceramic Tiled Shower Cubicle in Silverdale Read More »

=================================

Lancashire Tile Doctor

================================= Read More »

Scroll to Top