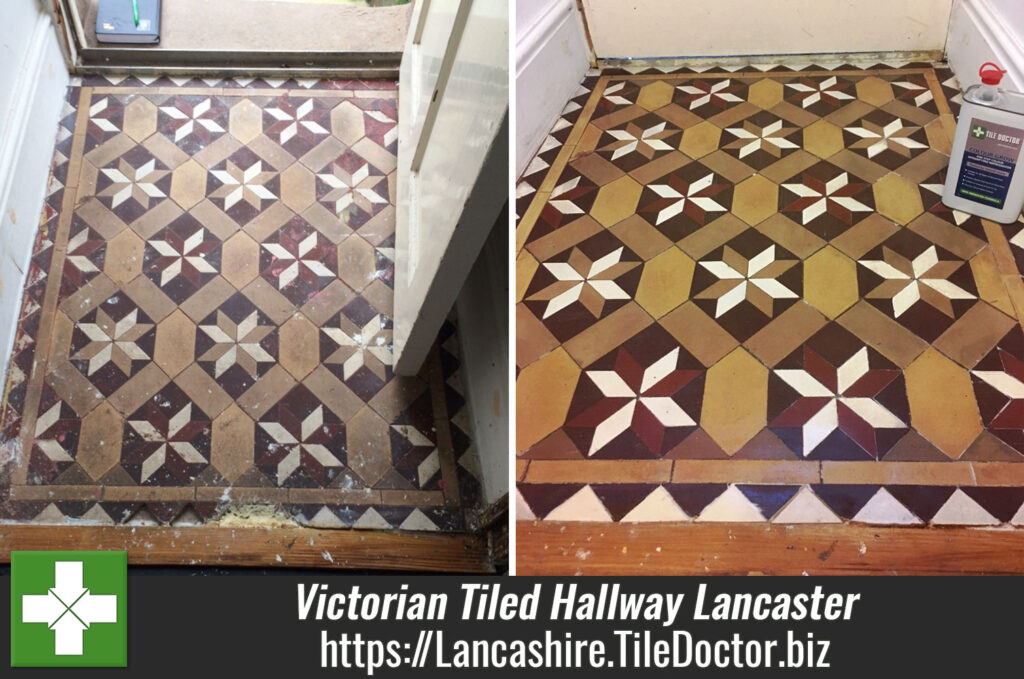
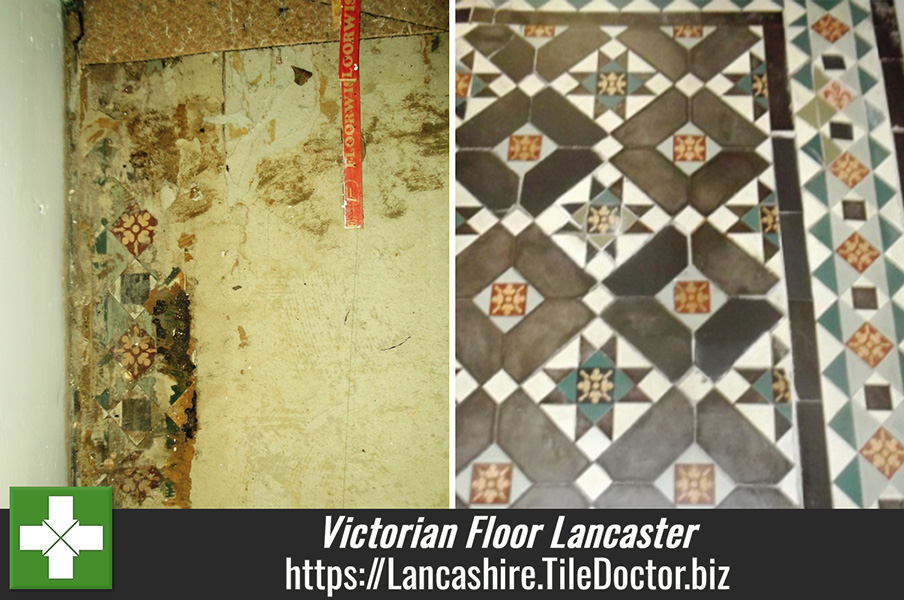
Lancaster Tile Cleaning

Lancaster Tile Cleaning

Welcome to my Work History archive where you will find examples of the cleaning and renovation of tiles carried out in Lancaster.

Black Limestone Floor Renovation in Lancaster

Clean and Seal of a Black Limestone Kitchen Floor in Lancaster

This customer from Lancaster contacted us about cleaning and sealing what they thought was a Blue Slate kitchen floor. Having spoke to them over the phone I arranged to pop over and survey the floor to get a better understanding of the work that needed to be done. Lancaster is a few miles South of our base in Carnforth and I’m always passing though.

Having visited the property I was able to confirm that the floor wasn’t Slate but Black Limestone which is notoriously high maintenance due to its acid sensitivity. I mentioned this and they were quite surprised as it had only been laid a few years earlier and it was sold as Black Slate. The two materials do look identical, but if you drop a small amount of something acidic on Black Limestone the stone fizzes and turns Grey and White.

Black Limestone Kitchen Floor Before Cleaning Lancaster

The big problem with Black Limestone is unlike Slate its very porous, this is why you see Slate being used for roof tiling and is still popular covering even to this day. Also, its very acid sensitive, so even Tea, Coffee, Juice, or Wine can mark it, so although popular in gardens it’s certainly not a stone we would recommend for use in a kitchen or bathroom.
Another problem you have is Black Limestone contains natural oils and it’s the oil that gives it that beautiful black colour. Once the oil is washed out of the stone over time or through the use of acidic cleaning products it leaves the stone looking grey and unattractive. This can be resolved however using an oil-based sealer but it is more expensive than a regular stone sealer.

Black Limestone Kitchen Floor Before Cleaning Lancaster

This stone is still workable though, so it’s not all bad news, with the right treatment it can look as good as the day it was laid (if not better) so I came up with a renovation plan that would do exactly that. They were happy to have the work done so we scheduled a date for the work to start.

Cleaning a Black Slate Floor Tiled Kitchen Floor

We find the best way to renovate floors like this is to use coarse diamond pads that can cut into the stone remove any surface damage, contaminates, old sealers and generally leave the stone very clean.

With this floor I started with a very coarse 50-grit DRB pad which is run several times over each stone using only water to lubricate the process. The process generates a lot of soiling and loose sediment that has to be rinsed off the floor with water and then extracted with a wet vacuum. Once this is done the process is repeated with a 100 and then 200-grit pad which together effectively re-hone the stone and remove any scratches caused by the previous pad. A dilution of Remove and Go was also used with the 200-grit pad to ensure the tiles were clean and any remaining sealer not caught by the pads had been removed.

The last step on the first day was to re-point the stone tiles where needed to remove failed and crumbling mortar. This was then left to set hard overnight so we could continue with the renovation the next day.

On day two we followed up the renovation of the stone by moving onto finer Burnishing pads starting with a 400-grit diamond pad applied in the same way and rinsing and extracting afterwards. This was followed by the application of an 800 and then 1500-grit pad to further refine and improve the stone.

Sealing a Black Slate Tiled Kitchen Floor

The following day the Black Limestone was sealed with a coat of Tile Doctor X-Tra seal which is the Oil based sealer I mentioned earlier. It brings out the true colour of this stone and the seal leaves a sheen appearance to give a very appealing finish. We find one coat is usually enough for this sealer as it’s a lot thicker that other sealers.

Black Limestone Kitchen Floor During Sealing Lancaster

Before leaving I talked through aftercare cleaning with two buckets and the importance of using a pH Neutral cleaning product. We recommend avoiding steam cleaners and not to use cheap bleach or acidic cleaning products which can damage the sealer with repeated use.

Black Limestone Kitchen Floor After Renovation Lancaster

We always encourage feedback from customers, and I’m pleased to be able to quote the following message they left on our feedback system:

Great service very organised and professional service would highly recommend

Black Limestone Kitchen Floor After Renovation Lancaster


Professional Restoration of a Black Limestone Kitchen Floor in Lancashire

Clean and Seal of a Black Limestone Kitchen Floor in Lancaster Read More »

Terrazzo Floor Renovation Beziers France

Renovating a Large Terrazzo Tiled Floor in Béziers France

The English owner of a French Chateau contacted Tile Doctor about the hard floors at their property in Béziers in the South of France. There were several floors at the property including Terrazzo, Limestone and Black and White Encaustic tiles all around a hundred years old and in a bad state of repair. There was a lot to cover so for this post we will focus on the Terrazzo flooring.

Terrazzo Floor Before Renovation Beziers France

We have been known to carry out tile renovation work in other counties so we were more than happy to consider a visit to the South of France and help bring the floors back to life. Previous overseas projects have included a hotel restaurant in Addis Ababa, holiday cottages in Ireland and a villa in France.

Luckily for us the customer had invested in some machinery that he had found on eBay but he didn’t have the technical knowledge to do the work and so had decided to seek help. Having discussed each of the floors in detail over the phone and with photographs sent via email I worked out a restoration plan for each floor.

We supplied the products he needed and we were flown down from Manchester to Béziers Cap d’Agde Airport where we were picked up by the client, (very Hollywood). If you have never been to Béziers before it’s well worth a visit, it’s a beautiful area, well laid out, with parks and rivers, an old 12th Century Monastery and the property had great views all around.

Tile Doctor Floor Renovation Bezier

Deep Cleaning and Filling Terrazzo Flooring in Béziers France

On arrival at the property work started with setting up the machinery and conducting some preliminary cleaning tests to work out the best approach. After that however our host insisted on showing us round Béziers, it was a Saturday afternoon and we were in the South of France so why not, they certainly know how to live properly down there.

Terrazzo Floor Before Renovation Beziers France Terrazzo Floor Before Renovation Beziers France

So, work started on the Sunday with the application of a 200-grit Milling pad and Oxy-Gel cleaning solution. I was concerned (due to some hairline cracks in the Terrazzo) that water would seep through into the rooms below (this was a big old townhouse set on four levels) so by using a gel-based product it would be easier to control and the moisture would be kept to a minimum.

Terrazzo Floor During Cleaning Oxy-Gel Beziers France

The resultant soiling was then extracted with a wet vacuum and attention moved to filling the cracks in the Terrazzo with a resin filler. Once the resin had cured the floor was cleaned again, this time with a 200-grit DRB Milling pad which contains diamond segments. The process was lubricated with water and progress was checked underneath several times to ensure the pad was working as expected.

Terrazzo Floor During Renovation Beziers France

Polishing a Terrazzo Floor in Béziers France

This work continued with increasingly finer diamond encrusted burnishing pads starting with a 400-grit Diamond burnishing pad and moving up to an 800-grit and finishing with a 1500-grit pad. Only water was used for lubrication and the soiling was extracted with a wet vacuum after each pad was applied. This method slowly improves the surface of the Terrazzo adding a long-lasting polished appearance.

The floor was left to dry overnight and the following day treated to a spray burnish using a very fine 3000 grit burnishing pad; the pad is applied dry to the floor with only a little amount of water which is sprayed onto the surface.

Sealing Terrazzo Flooring in Béziers France

This final 3000-grit pad leaves the floor dry and allows the floor to be sealed shortly afterwards. The sealer chosen for the Terrazzo was Tile Doctor Colour Grow which is a colour enhancing impregnator which works by soaking into the pores preventing dirt from residing there. Sealing the floors keeps the dirt and other contaminates on the surface where it can be easily removed.

Two coats of Colour Grow were applied and this brought out the lovely pink tones in the Terrazzo which together with the polished appearance really transformed the appearance of the floor.

Terrazzo Floor After Cleaning Beziers France

For aftercare cleaning I got the customer to purchase a five-litre bottle of Tile Doctor Neutral Cleaner along with the other products. You must be careful what you clean sealed floors with as many products contain bleach and are simply too strong resulting in the premature degradation of the sealer.

We spent the whole week at the property and as well as working on the other floors did find time to do some more sightseeing before flying back the following weekend.


Professional Renovation of a Terrazzo Flooring in France

Renovating a Large Terrazzo Tiled Floor in Béziers France Read More »

Red And Black Victorian Tiled Floor Dorchester Pattern Restoration Lancaster

Dorchester Pattern Victorian Tiled Hallway Floor Restoration in Lancaster

This is a Red and Black Victorian tiled floor laid in a Dorchester pattern at a property in Lancaster. The owner has only just bought the property which dates to the 1890s and this floor had previously been covered in carpet which had started to smell and leave a pungent aroma in the air.

Red And Black Victorian Tiled Floor Dorchester Pattern Before Cleaning Lancaster

Once the carpet had been removed and the Victorian floor allowed to breathe and dry out the smell disappeared. This is the right course of action with old floors which were laid without a damp proof membrane, floors of this age need to breathe and allow moisture to rise through the tile and evaporate at the surface, carpets and underlay prevent this.

Red And Black Victorian Tiled Floor Dorchester Pattern Before Cleaning Lancaster

The damp issues had resulted in efflorescent salts being deposited on the surface of some of the tiles and this is an important consideration when cleaning the floor. Salts and damp go together, so the more water we use the more salts will come through after the floor has been cleaned. Additionally using an alkaline cleaner such as Tile Doctor Pro Clean or Remove and Go this will further increase the alkalinity of the floor and cause yet more salt issues so a different approach is required.

Cleaning a Victorian Tiled Hallway Floor

Naturally I didn’t want to exacerbate the moisture problems by using liquid products to clean the floor, so I used a low, moisture cleaning technique. This involves applying Tile Doctor Acid Gel as the main cleaning agent and working it in with a 200-grit milling pad fitted to a rotary machine. The gel keeps the moisture level low, and it is a very effective cleaning product and being an acid will neutralise the salts in the floor and keep the pH level at the correct balance. Once done the floor was briefly rinsed with water and all the soils extracted with a wet vacuum.

Red And Black Victorian Tiled Floor Dorchester Pattern During Cleaning Lancaster

The floor was left to dry off overnight then I called back the following day to see how it had faired. There were some areas where efflorescent salts had appeared, so I spot treated these areas with more Acid Gel and then scrubbed and rinsed with water using the wet vacuum again to remove as much moisture as possible. You will see on the photos how soft the salt was and I was able to scrape it off without too much difficulty, however if left untreated this salt would harden into a crystalline structure and become more difficult to remove.

Red And Black Victorian Tiled Floor Dorchester Pattern Efflorescencent Salt Removal Lancaster

Sealing a Victorian Tiled Hallway Floor

To make sure the sealer would cope with the damp floor I applied a thin coat of Tile Doctor X-Tra Seal to several areas before leaving. The decision on which type of sealer to apply was influenced by the damp issues as the moisture needs to be able to evaporate at the surface, so it is important to select a fully breathable sealer.

Red And Black Victorian Tiled Floor Dorchester Pattern After Cleaning Lancaster

I called back the following day and the floor was more settled, and the sealer had fully cured, the client gave his thumbs up and we continued sealing the floor with one coat of Tile Doctor X-Tra Seal which is fully breathable.

Red And Black Victorian Tiled Floor Dorchester Pattern After Cleaning Lancaster

Once completed the floor was transformed and worked well with other period features in the property. For aftercare cleaning I recommended the use of a Neutral PH cleaning product such as Tile Doctor Neutral Clean.


Professional Restoration of a Victorian Tiled Hallway in Lancashire

Dorchester Pattern Victorian Tiled Hallway Floor Restoration in Lancaster Read More »

Black Caithness Slate After Renovation Gressingham

Caithness Black Slate Floor Restored with Milling Pads in Gressingham

The photos above detail the restoration of Black Caithness Slate pavers at an old cottage in the village of Gressingham on the outskirts of Lancaster. The building was in the process of being completely overhauled and the floor was next on the long renovation to do list.

Black Caithness Slate Pavers Before Cleaning

Caithness Slate from the northern tip of Scotland and is known for its durability and strength however the years had certainly not been kind to this floor and it was in a very bad state.

To restore the appearance of the slate I recommended milling the floor with a set of very coarse pads that would remove a thin layer of stone off the top of the paving slab to reveal new stone underneath. The pointing was also cracked and loose in places so that would also need chopping out and replacing. After milling the stone would also be smoother and once sealed much easier to maintain going forward.

Black Caithness Slate Pavers Before Cleaning Black Caithness Slate Pavers Before Cleaning

I estimated the process would take four days to complete. Happy to go ahead with the quote a date was booked for the work to start.

Resurfacing Caithness Black Slate

On the first two days there were two of us involved to get through milling the stone which is hard work. We used a set of milling pads applied to a weighted floor machine to cut through the stones surface using water for lubrication. This generates a lot of stone dust so a lot of rinsing and extracting needs to happen to remove it.

Milling carried on into day two but by the end we had started knocking out the old pointing which had already failed and wasn’t too difficult to remove. It was one big room with a partition at one end, the building itself was built in the 1870s or at least that’s as much information as the client could find as it was bought in an auction.

Black Caithness Slate Pavers During Renovation Black Caithness Slate Pavers During Renovation

Due to its age, it had no water or electricity, so we had to work off generators whilst a rudimentary system supplied the water. This was not the easiest job for us as the generators were proving difficult to work with as the relays would overload and cut off the power; this happened more than a dozen times just in the first day alone, but we like a challenge.

As you will see from the pictures the stone flagstones were transformed. This was not a simple clean and seal job, this is milling back the surface using various diamond grits a heavy weighted buffing machine and patience, and some water. Using a wet system, the milling system won’t leave a house full of dust and the diamond grinding leaves the stone much smoother and a lot cleaner which makes it a lot easier to clean and maintain in the future.

Sealing a Caithness Black Slate Tiled Floor

Once the milling was complete and the new flexible breathable pointing was applied for which we like to use a product called VDW 800. We then called back the next day and finished the clean, the floor area was left for another day to dry.

Black Caithness Slate Pavers During Sealing

Once dry, the floor was then sealing using a single coat of Tile Doctor X-Tra seal which is oil-based sealer that really brings out the colour of the Black slate. Additionally, this sealer is fully breathable so it will cope with the damp conditions you find with old floors that don’t have a damp proof membrane and so won’t peel off after a few weeks.

Black Caithness Slate Pavers After Renovation

The client was very happy with the transformation and final finish and invited us back to cover more work in the outbuildings which eventually will join onto the main house. For aftercare cleaning I recommended Tile Doctor Neutral Clean which is an effective tile and grout cleaner that won’t upset the sealer.

Black Caithness Slate Pavers After Renovation Black Caithness Slate Pavers After Renovation


Professional Restoration of a Caithness Black Slate Tiled Floor in Lancashire

Caithness Black Slate Floor Restored with Milling Pads in Gressingham Read More »

Quarry Tiled Floor Renovation Caton Lancaster

Black and Red Dorchester Pattern Quarry Tiled Floor Renovation Caton

A first glance you might not notice much improvement in this Quarry tiled floor that we recently worked on at a Victorian house in Caton near Lancaster. However, look closer and you will see that a pattern has been worn into the tiles from a previous covering most likely carpet underlay.

The sealer on the floor was also due to be replaced so having surveyed the floor on my initial visit I worked out a plan to renovate the Quarry tiles which would include deep cleaning the tile and grout, removing the underlay patterning, and then re-sealing the tiles to keep them protected.

Quarry Tiled Floor Before Cleaning Caton Lancaster

Deep Cleaning a Quarry Tiled Floor

To start neat Tile Doctor Oxy-Gel was applied to the floor and left to soak in for twenty minutes giving it time to break down soils etc. Then a 200-grit Diamond burnishing pad was attached to floor buffing machine which was a heavily weighted for extra grip and run a few times over the tiles. These pads are very aggressive and ideal for cleaning off the pattern left by the carpet underlay.

Oxy-Gel was chosen for this as being in Gel form its more manageable and holds itself against the clay Quarry tile for longer allowing the product work to a much harder, whereas a liquid cleaner generally soaks away into the clay and underneath meaning you need to use more water to remove it later resulting in longer drying times.

Quarry Tiled Floor Before Cleaning Caton Lancaster

After the gel has been scrubbed into the tiles (no water needed at this stage) a wet vacuum Is used to remove the soiling generated during the process. After this initial clean a small amount of water is added to the floor and we go over with the same 200-grit diamond pad extracting the water off the tiles within five minutes of it being applied.

With the Oxy-Gel removed the floor was given and acid rinse using Tile Doctor Acid Gel using the same process as before but this time using a Black scrubbing pad and only allowing it to dwell for 10 minutes. Acidic products are quicker acting on clay and so need less dwell time for it to work. Water was then added and after brushing it in to the floor it was removed using the wet vacuum within five minutes. I sometimes do this job twice as this is the last of the deep cleaning process and will ensure the tiles are free from any debris and dirt before we allow the clay tiles to dry out before sealing.

Before finishing for the day, I took time to apply matching grout where it was missing which was mainly around the edges and sponged off the excess. With this done the floor was left to dry off overnight.

Sealing Quarry Tiles

The next day we conducted a damp test, but despite the use of Gel cleaning products it was still too damp to seal. My client however wanted to seal how the tiles would look with the sealer we were planning to use which was Tile Doctor X-Tra Seal, so to do this three tiles were force dried using an Air blower and a Heat Gun.

With the sealer approved the floor was left for two days so it could fully dry out, the damp test showed a much better reading and we were able to crack on applying the sealer to the whole floor. Only one coat of X-Tra Seal was needed, it’s a thick Oil based product that soaks into the pores of the tile protecting it from within, it also fully breathable so ideal for old floors like this one that don’t have a damp proof membrane. Lastly it contains a colour enhancing formula that in this case improved the deep Red and dark Black colours in the tile.

Quarry Tiled Floor After Cleaning Sealing Caton Lancaster

Lastly for aftercare I recommended Tile Doctor Neutral Tile Cleaner which is a gentle but effective tile and grout cleaning product. You have to be careful when choosing an cleaning product for use on sealed tiles as many are bleach based and simply too strong.

Quarry Tiled Floor After Cleaning Sealing Caton Lancaster


Professional Restoration of a Quarry Tiled Lobby in Lancashire

Black and Red Dorchester Pattern Quarry Tiled Floor Renovation Caton Read More »

Indian Sandstone Patio Deep Cleaned in Lancaster

Large Indian Sandstone Patio Renovated in Lancaster

The picture below is of an Indian Sandstone Patio at a property in Lancaster which has turned green with algae and lichens from the surrounding bushes etc. It had been a while since it was properly cleaned and was likely to get worse over winter and slippery. You can see from the photograph that the beautiful stone was unrecognisable and clearly overdue a deep clean.

Indian Sandstone Patio Before Cleaning Lancaster

You would be right in thinking that Tile Doctors mainly work on internal floors but in fact were just as happy working outside as in, assuming the weather stays fine of course. In fact, we love working on driveways and patios as it’s nice to work outside for a change. We also have solutions for most problems including blackspot and deep-seated dirt.

Deep Cleaning an Indian Sandstone Patio in Lancaster

On arrival I started by power washing to remove as much dirt as possible, this was then rinsed off and the Sandstone inspected. I the sprayed the patio with Tile Doctor Patio & Brick Driveway Cleaner and left it to soak in and get to work for about half an hour. The patio was then scrubbed with a rotary machine fitted with a carbide brush. This process removes the deep-seated dirt and staining. The whole patio was then rinsed again to remove the soiling.

We have had some good weather this summer and so it wasn’t long before it had dried and I was able to inspect the patio and repeat the process focusing on the stubborn staining and to make sure the black spots were removed. To treat the Blackspot, I applied more Patio & Brick Driveway Cleaner directly to the affected areas and left it to get to work before hand-scrubbing it in. To be thorough I also looked for paint stains which can happen during the decorating of window frames, sills, and doors; I didn’t find any in this case but if I had I usually treat them using Tile Doctor Remove and Go.

Sealing an Indian Sandstone Patio in Lancaster

We don’t usually seal external tile and stone (unless it’s a Black Limestone or Marble), the reason being that the weather in Lancaster is very variable with hot weather in the summer (record breaking this year) down to minus ten degrees in winter.

Outdoor sealers can cope with these temperatures but will break down outside of their tolerant range, also its important to apply sealers when bone dry as any moisture trapped in the stone or tile could freeze and breakdown the sealer prematurely. If this happens you have no option but the take off all the existing sealer and start again, because of this we have concluded that for most external stone and tiles it’s best to just power wash them clean once or twice a year.

Indian Sandstone Patio After Cleaning Lancaster

Once done the natural beauty of the Indian Sandstone came through and the patio was transformed much to the delight of the owner.


Professional Restoration of an Indian Sandstone Paved Patio in Lancashire

Large Indian Sandstone Patio Renovated in Lancaster Read More »

Mouldy Ceramic Tiled Bathroom Refresh Hest Bank

Renovation of a Mouldy Ceramic Tiled Bathroom in Hest Bank Lancaster

We were recently asked to refresh the Ceramic Wall Tile and Grout in the bathroom of a property in Hest Bank which is a small village on the coast North of Morecombe Bay and Lancaster. Ceramic tiles are glazed so very easy to keep clean however the main issue wasn’t the tiles themselves but the grout and silicone sealant which over time had turned black in some areas due to mould and staining.

Ceramic Tiled Bathroom Before Cleaning Hest Bank

This is not uncommon problem in small bathroom were a general lack of ventilation provides the moist conditions that mould thrives in. Additionally, the top layer of grout is slightly porous and having a rough surface it does attract dirt over time.

The only real solution to this problem is to improve the ventilation however you can minimise the problem by opening windows during showering and leaving the bathroom door open afterwards to improve cross ventilation. In the meantime, however you can keep on top of the problem with a little renovation work.

Ceramic Tiled Bathroom Before Cleaning Hest Bank

Deep Cleaning Grout in a Ceramic Tiled Bathroom

The renovation started by scrubbing the grout and sealant with Tile Doctor Duo-Clean which is a purpose made bathroom tile and grout cleaner designed to tackle mould and staining. It also kills mould spores that are still prevalent and can respawn resulting in more mould. Once done, I always like to leave any remaining product with the client for this reason so they can re-treat the problem in the future.

Scrubbing with Duo Clean worked well but some of the staining was simply so deep to remove so the only solution was to scrape it out of the grout joints with a flat blade and Stanley Knife and then re-grout. The silicone sealant around the bathtub was very badly affected by mould and had to be completely stripped out using the same method.

Grout Sealing a Ceramic Tiled Bathroom

Once the treatment was completed the tile and grout was dried off thoroughly and then a coat of Tile Doctor Wall Tile and Grout Sealer was sprayed onto the grout to help protect it from mould forming going forward. This product is very easy to use and adds a protective layer over the surface of the grout to prevent the mould spores or limescale attaching itself. It also makes the tile and grout easier to clean afterwards.

Ceramic Tiled Bathroom After Cleaning Hest Bank

Once this was done a fresh mould resistant and waterproof brand of silicone was applied to the joints between the tiles, and the bath and sink. With the fresh silicone in place and the tile and grout renovated the bathroom looked almost new and much more inviting.

For aftercare I recommended using Tile Doctor Aqua-Pro which is designed for cleaning bathroom and shower tiles, you will find this product is a mild but effective cleaner that will promote the length of the sealer applied earlier. Many tile cleaning products are bleach based and these will strip the sealer off, so it is well worth bearing that in mind when purchasing household cleaners.

Ceramic Tiled Bathroom After Cleaning Hest Bank

The client was very happy with the work we had carried out and were no longer embarrassed to allow people to use their bathroom.


Professional Restoration of Ceramic Tiled Bathroom in Lancashire

Renovation of a Mouldy Ceramic Tiled Bathroom in Hest Bank Lancaster Read More »

Sandstone Patio Floor Before After Renovation in Bolton Le Sands

Black Spot Removed from an Indian Sandstone Patio in Bolton-Le-Sands

This Indian Sandstone Patio in Bolton-Le-Sands near Lancaster had not been cleaned successfully for several years. Although the owner had power washed it on occasion, that won’t rid you of Black Spot, Mould, Lichen etc and this will build-up over the years. It does clean the stone up to a certain standard but at some point, it will need further treatment.

My client had now reached this point and decided to give Tile Doctor a call to have it renovated. We discussed the Patio which ran around the house and calculated that it measured approximately 60m2. With the measurements and a summary of the issues I was able to work out a quote which they were happy to accept.

Indian Sandstone Patio Before Cleaning in Bolton-Le-Sands

Removing Black Spot from an Indian Sandstone Patio

To improve the appearance of the stone I started by giving it a power wash to remove the general grime and dirt. I used a top of the range Karcher Pressure Washer for this which can apply up to 20 bars of pressure. The machine also comes with a spinner attachment results in a much more even clean than simply using the spray head.

The patio was left to dry for thirty minutes before applying neat Tile Doctor Patio & Brick Driveway Cleaner. Please note this is a very powerful product meant for professional use so if you’re using it always wear gloves and protective glasses. You leave it on the stone for ten minutes or longer before working it in. The directions on the back of the bottle say recommend leaving it for two to four hours, but its general advice. Personally, I find it is best to test the timing on a small inconspicuous area first, leave it on for say ten minutes then add a bit of water, scrub the surface and if the Black Spot disappears then that is all the time you need. If the stain is stubborn, increase the time. The two to four hour recommendation is really for difficult Black Spots that have become ingrained into the stone and then the product needs longer to digest the stain before it can work.

Once that was done, I used the power washer on low pressure to wash the products off the stone and into the sewerage drain, a wet vacuum comes in handy for this. Don’t dispose of it into the grass or planting areas as the strong chemicals in the product could upset them. Many properties have a soak away to capture rainwater from gutters, so you need to make sure it’s the sewage drain you are using.

Indian Sandstone Patio After Cleaning in Bolton-Le-Sands

As you can see on the pictures, this product really does work and got rid of the Black Spot completely. To maintain the patio a regular jet wash was recommended, the household versions are ideal for keeping it clean and tidy.

Due to the size of the Sandstone patio the whole process took around six hours to complete. Once done though the patio looked transformed and was all ready for a barbeque and some guests. Hopefully, it will stop raining long enough for this to happen.

Indian Sandstone Patio After Cleaning in Bolton-Le-Sands


Professional Restoration of an Indian Sandstone Patio in Lancashire

Black Spot Removed from an Indian Sandstone Patio in Bolton-Le-Sands Read More »

Victorian Black and Red Floor Restoration Lancaster Lancashire

Original Red & Black Victorian Tiled Floor Fully Restored in Lancaster

This old Red and Black Victorian tiled floor at a property in Lancaster was in a bit of a state and had numerous issues that needed resolving as part of the restoration. This included dealing with an old, tiled fireplace hearth, but as the fireplace had been removed years ago it was now a bit of an eyesore as it did not match the rest of the floor.

Victorian Black and Red Floor Before Cleaning Lancaster

Additionally, some of the tiles had been ripped up along one edge of the floor to make way for a gas pipe, but this was now capped off. This area would need replacement tiles matching the original to be sourced and put in place.

Victorian Black and Red Floor Before Cleaning Lancaster

Lastly the whole Quarry tiles floor had previously been covered in carpet so there were adhesive stains all over the floor, not to mention the ingrain dirt that had accumulated in the tile itself.

Victorian Black and Red Floor Before Cleaning Lancaster

We specialise in restoring old Victorian tiled floors like this one and you will find lots of examples of this sort of work on our website. Our service is quite unique as we generally find other companies either offer a cleaning service or just a repair service; Tile Doctors on the other hand offer a full solution.

Removing Carpet Adhesive from a Victorian Tiled Floor

The first job was to remove the carpet glue and old splashes of paint which we tackled by spraying the floor with a strong dilution of Tile Doctor Remove and Go. Designed for use on tile and stone this product is a coatings remover combined with a cleaning agent. This was left to soak into the tiles for ten minutes before it was worked in with a coarse 200-grit pad fitted to a rotary buffer machine. The floor was rinsed with water and then an industrial wet vacuum extracted all the soils away.

Stubborn marks were retreated and then once happy with the initial clean the tiles were treated to an acid rinse using Tile Doctor Grout Clean-Up. Not only does this product remove old grout smears from the tiles it also helps to restore the natural pH of the floor after the use of an alkaline cleaner such as Remove and Go. The acid in this product also slightly etches the clay tile which will allow for a better bond with the sealer later.

Lastly, I had noticed evidence of efflorescent salt staining which is a common issue on old Victorian floors that don’t have a damp proof membrane. It’s caused by salts being carried up through the floor as moisture evaporates from the subfloor and results in unsightly white salt deposits being left on the surface of the tile. An acidic cleaning product such as Grout Clean-up can counter the alkaline salts but for best results, we like to use Tile Doctor Acid Gel, it’s a slightly stronger product and being a gel allows it to sit in place for longer. After finishing the floor, it was given another rinse with water to remove any trace of product and then dried as much as possible with the wet vacuum.

Sealing a Victorian Tiled Floor

A lot of water was used in the cleaning process, so the floor was left for four days before returning to add the sealer. For best results, It’s not a good idea to apply sealer to a damp floor and to avoid any doubt use a damp meter to obtain a moisture reading and compare it with one taken before cleaning.

To seal the floor two coats of Tile Doctor Colour Grow were applied, this is a fully breathable sealer and if the salts do come back this sealer will let the efflorescence breathe through to the surface where it can be easily mopped off the floor, we use Tile Doctor Concentrated Neutral Cleaner for this.

Victorian Black and Red Floor After Restoration Lancaster

In the after pictures, you will see the difference we have made to this floor, bringing it back to its former glory, the house was built in 1901 so the floor is original and that makes it 120 years old. not all floors would look this good after that length of time.

Victorian Black and Red Floor After Restoration Lancaster


Professional Restoration of a Victorian Tiled Floor in Lancashire

Original Red & Black Victorian Tiled Floor Fully Restored in Lancaster Read More »

Flagstone Floor Renovation Carnforth

Renovating Flagstones Covered in Concrete Screed and Bitumen in Carnforth

The owner of this Flagstone floor at a property in Carnforth was told by a damp specialist to remove the carpet and underlay and have the floor taken out and skipped. Then to install new hardcore and concrete put in place but with a Damp Proof Membrane installed in between, then once fully cured (four weeks at least) they could have a new carpet, tile or wood floor etc. installed. All good advice, however, the owner of the house wanted to keep as many original features as possible and wasn’t keen on the proposal.

Looking for an alternative solution they reached out to Tile Doctor and so I went over to take a look. After surveying the floor, I came up with a completely different solution which involved milling the stone with coarse abrasive pads to remove the screed and bitumen and then resurface with diamond encrusted burnishing pads of medium and fine grits which would result in a smooth finish. Not only would this be much easier to clean going forward it would also be much more attractive, especially once sealed.

Flagstone Floor Before Renovation Carnforth Flagstone Floor Before Renovation Carnforth

Happy with our alternative we arranged a date to come and do the work which would take three days, two days to prepare the floor and a third to apply a sealer.

Cleaning a Flagstone Tiled Ground Floor

Milling a floor is arduous work and requires the use of a heavy rotary machine that can apply weight onto the stone so the milling pads can really get a bite into the surface. Because of this I roped in a colleague to help take some of the strain. Some of the areas of bitumen and screed were so prominent we used an SDS hammer action drill with a flat bit to chisel them off first, this can leave a few marks in the stone which we then level out with the milling pads starting with a 50 grit and go all the way up to a 400 grit

Flagstone Floor During Renovation Carnforth Flagstone Floor During Renovation Carnforth

We used a lot of water during this process to help lubricate the abrasive action of the milling pads, this also helps to rinse off the soil that is created, all of which is extracted with a wet vacuum.

Next step is to give the floor an acid rinse with Tile Doctor Grout Clean-Up which is designed to neutralise any alkaline salts in the stone that could result in efflorescence later.

With the floor cleaned up the last step was to re-point between the Flagstones using a breathable pointing product called GFtK 800.

Flagstone Floor After Cleaning Carnforth Flagstone Floor After Cleaning Carnforth

Sealing a Flagstone Tiled Ground Floor

Sealing was the next step however the floor was still quite damp after the initial renovation, so it was left for a few days to dry out first.

We selected a fully breathable sealer for this floor, this is an important requirement for a floor with no damp proof membrane as it will allow moisture to rise through the flagstone and evaporate at the surface. The concrete screed and bitumen covering will have prevented this previously which is dangerous as a build up of moisture in the stone can lead to it crumbling and you risk moisture reaching out to the walls where it can lead to rising damp.

Tile Doctor has three breathable sealers to choose from and in this case the customer decided to go with Tile Doctor Colour Grow which is an impregnating sealer that protects from within and enhances the natural colours in the stone.

Flagstone Floor After Sealing Carnforth Flagstone Floor After Sealing Carnforth

The floor was completely transformed by the end of the third day, you would not have known it was the same floor. It was now clear of all the previous coverings and now looked like a characterful old Flagstone floor should.

Before leaving I recommended, they use Tile Doctor Neutral Cleaner for everyday cleaning, being pH neutral it won’t prematurely erode the sealer allowing it to work for longer. I also advised that it’s possible that parts of the stone may go a shade darker in winter and a shade lighter in summer due to the moisture rising through the floor.


Professional Restoration of a Flagstone Tiled Ground Floor in Lancashire

Renovating Flagstones Covered in Concrete Screed and Bitumen in Carnforth Read More »

Victorian Hallway Floor Before After Restoration Lancaster

Yellow and Black Victorian Hallway Floor Tiling Restored in Lancaster

I thought I would share this case history of a Yellow and Black Victorian Tiled floor that we worked on at a large house in Lancaster last year. It’s a great example of the typical problems we face with old Victorian floors, especially around door thresholds where the transition between the different foundation invariable cause problems.

I didn’t know the full history of the floor, but it was now in quite a state and recent renovation work had left the floor unstable with loose and cracked tiles. The tiles needed to be removed and then the damaged subfloor carefully scraped out and replaced. Once that was done the floor would need relaying and then cleaned and sealed so everything would blend in.

After visiting the property and providing a quotation we were given the go ahead and agreed a date to do the work.

Repairing a Yellow and Black Victorian Tiled Hallway Floor

We returned on the agreed date and set about carefully removing the loose and cracked Victorian tiles and put them aside for later use. Some would need replacing however this would not present a problem and they are still widely available, and I have several contacts I can turn to for this.

Yellow and Black Victorian Tile Floor During Restoration Lancaster

Once this was done and the subfloor exposed and cleaned up, I used self-levelling cement to bring the floor level up and in-line with the existing. This now needed to set hard, so the rest of the day was spent cleaning up the tiles we removed earlier with Tile Doctor Grout Clean-up and Pro-clean. Our goal is to reuse as many of the original tiles as possible to preserve the heritage of the floor.

The next day with the new subfloor set it was ready for tiling. This involves laying out the tiles first without adhesive carefully cutting and fitting new tiles as needed to maintain the overall pattern of the floor. Once I was happy the tiles were moved to a board and then fitted with fresh adhesive.

Yellow and Black Victorian Tile Floor During Restoration Lancaster

Deep Cleaning a Victorian Tiled Hallway Floor

I came back on day three with the aim of cleaning the floor so it could be sealed however whilst inspecting my new tiling I was disappointed to discover some were not as level as I had hoped. I had noticed the replacement tiles were not the same thickness as the originals the previous day but I had worked around this by using different levels of adhesive, clearly this plan was not as effective as I had hoped for.

To counter this problem, I used a set of 50-Grit, 100-grit and then 200-grit diamond pads in sequence to mill the floor flat and remove the lippage between them. This is done with water to lubricate the process and a weighted floor buffer. The pads generate a lot of slurry and so you need to rinse this off with more water and extract all the soil after each pad.

I followed this up with various Diamond burnishing pads of increasingly finer grits across the whole floor until we achieved a consistent finish and had the added benefit of getting the whole floor clean. More water is used to rinse the tiles after burnishing and the soil extracted with a wet vacuum as before. Once done and inspected the floor was left to dry off overnight.

Sealing a Large Victorian Tiled Floor

Tile Doctor Colour Grow was applied to enhance the appearance of the tiles and protect them going forward. This product copes well with damp which can always be a problem with old floors like this one with no damp proof membrane present.

Yellow and Black Victorian Tile Floor After Restoration Lancaster

The floor looked amazing when finished and our attention to detail had really paid off, in fact you simply could not tell we had done any tiling work or replaced any tiles. For aftercare I recommend the use of Tile Doctor Neutral Cleaner which is designed for the regular cleaning of sealed tiles.

Yellow and Black Victorian Tile Floor After Restoration Lancaster


Professional Restoration of a Victorian Tiled Hallway in Lancashire

Yellow and Black Victorian Hallway Floor Tiling Restored in Lancaster Read More »

Black Slate Tiled Kitchen Floor Before After Clean Seal Lancaster

Renovation of a Black Slate Kitchen Floor in Lancaster

The photographs below are of a dull and dirty Black Slate floor that I was recently asked to renovate at a property in the City of Lancaster which is a few miles south of our base in Carnforth.

Black Slate Floor Before Renovation Lancaster

Slate isn’t very porous which is why you often find it being used as roofing; however, this means any sealer applied is primarily active on the surface where it is more prone to wear from foot traffic. Regular cleaning with a pH neutral tile cleaner combined with topping up the sealer every 12 to 18 months will make the sealer last a lot longer. This rarely happens though and once a sealer has been worn off dirt will begin to penetrate the stone making it difficult to clean and dull.

In this case my client explained that the sealer had been applied by the tiler a few years ago and that they had been using washing up liquid to clean the floor. pH levels for washing up liquids vary but the most popular product has a pH level of 9 which is far too acidic for use on a sealed tile and slowly stripped the sealer away. I discussed with the client the process for renovating the slate floor, agreed a price for the work and arranged to come back a few weeks later.

Cleaning a Black Slate Floor Tiled Kitchen Floor

To renovate the floor, I first attached a coarse 200-grit Diamond pad to a buffing machine and ran it over the floor using water as a lubricant. This removed what was left of the old sealer deep cleaned the stone. The Grout was then scrubbed with Tile Doctor Pro-Clean and the floor was then rinsed with water and the soil extracted with a wet vacuum.

The floor was then inspected, and stubborn areas were spot treated with a little Tile Doctor Remove and Go which was sprayed on and left to soak in for ten minutes before being scrubbed in and rinsed off.

We finished the clean with a 400-Grit diamond padf followed by an Acid Wash with Grout Clean-Up, this left the Slate with a slightly acidic pH which helps bond the new sealer and counters the alkaline pH of the floor following the use of alkaline cleaning products.

Sealing a Black Slate Tiled Kitchen Floor

Before we sealed the whole floor, we always do some damp testing to make sure it is dry before sealing. This was an old floor with no damp proof membrane underneath so it needed to be very dry before we could apply the sealer.

Black Slate Floor Moisture Testing Before Sealing Lancaster

The client wanted a very high gloss finish, so we applied four coats of Tile Doctor High Shine sealer which is an acrylic sealer ideal for achieving this affect. If the floor wasn’t fully dry, we would have left it another day or two, but we find you can often speed up the drying process with the use of a dehumidifier and some air blowers.

Black Slate Floor During Renovation Lancaster

The client was very happy with the transformation in the Black Slate floor, they had looked dull and drab for quite a while and it was refreshing to see them look like new again. They also felt more confident that now they understood what had caused the problem and would be better able to maintain the floor going forward.

Black Slate Floor After Renovation Lancaster


Professional Restoration of a Black Slate Tiled Kitchen Floor in Lancashire

Renovation of a Black Slate Kitchen Floor in Lancaster Read More »

Amtico Vinyl Floor Before After Cleaning Silverdale

Renovating Amtico Vinyl Flooring in Silverdale

This client from Silverdale had called us over to renovate their 12-year-old Amtico vinyl floor that runs from the back door, through the kitchen and then over to the dining room. Although modern brands of Vinyl are much more durable than in the past, they do require a sealer to protect the surface from marking, enhance the colour and general appearance. This floor had not been retreated for twelve years and so its appearance had become dull and patchy in places.

Amtico Floor Silverdale Before Cleaning Amtico Floor Silverdale Before Cleaning

Tile Doctors are trained in the renovation of all types of Tile and this includes Vinyl flooring with which we use the same methods and equipment to strip the old sealer away and replace with new. Vinyl if a manufactured material so the products we use are different and Tile Doctor supply a Stripper and Sealer which are designed for the job.

Cleaning and Stripping an Amtico Vinyl Floor

We started by applying a clear mastic silicone around the base of the MDF panels in the kitchen, we would be using water in the cleaning process, so this was done to prevent any moisture being absorbed via capillary action which would ruin the panels.

Amtico Floor Silverdale Prep Before Cleaning

Once the area was prepped, we started stripping the old sealer off the Amtico using Tile Doctor Vinyl Strip diluted with five parts warm water. The solution was gradually applied as a slow speed buffing machine fitted with a black scrubbing pad was run over the surface. The soil generated was rinsed off the floor with water and then extracted using a wet vacuum

The floor was then steam cleaned to remove any excess product from the Vinyl, as well as making sure the floor area was as clean and dust free as possible before moving onto the next step of applying a fresh sealer.

Amtico Floor Silverdale During Steam Cleaning

The Amtico would need to be dry in order to seal it so as much moisture as possible was removed using the wet vacuum and then left to dry for about an hour with air blowers in place. This is very important as applying sealer to a damp Vinyl floor can cause issues with the bonding process resulting in the affected area turning white and feeling sticky.

Amtico Floor Silverdale Drying After Cleaning

Sealing Amtico Vinyl Flooring

Once I was satisfied the floor was dry three thin coats of Tile Doctor Vinyl Shine applied to the Amtico leaving the floor to dry for up to forty minutes between coats. Thin coats are the key, if it has a blueish tinge to the seal (what we call pooling) then the coat is too thick and needs to be thinned out which is best done with a paint pad. If the first coat is patchy, we just let it dry and then add a second coat to which will even out the patchiness.

Amtico Floor Silverdale After Cleaning Amtico Floor Silverdale After Cleaning

Tile Doctor Vinyl Shine is a modern high solids polymer floor seal and polish designed to protect and enhance the appearance of Vinyl floor tiles. It works well on all types of Vinyl including Amtico and Karndean and the optional third coat adds a super high gloss finish.

The floor looked great and really lifted the room. The client was very happy with the result and was kind enough to leave the following feedback.

”Very professional, efficient service, with an excellent end result. Very clean and tidy, punctual and made sure the job was finished to a high standard. Very pleased with the finish on my Amtico floor. – Sheila and Kevin S”


Professional Clean and Seal of an Amtico Tiled Kitchen in Lancashire

Renovating Amtico Vinyl Flooring in Silverdale Read More »

Quarry Tiled Floor Before After Renovation Lancaster

Old Quarry Tiled Floor Repaired and Renovated in Lancaster

The pictures below are taken from a property in Lancaster which had two areas of tiled flooring that needed work, one Quarry tiled and the other an original Victorian tiled hallway which was over 100 years old.

We often get called out to restore broken tiles, replace missing pieces and then do a clean and seal afterwards to make it all look as good as possible. Tile Doctor covers both areas and our aim is to restore a tiled floor to its best possible condition, ideally making it look new or at least as close to new as is feasible with an old floor.

Quarry Tiled Floor Lancaster Before Repair

Repairing a Quarry Tiled Floor in Lancaster

The focus of this article will be the renovation of the Quarry tiled floor which required a lot of tiling work due to cracked and missing tiling. This presents a problem as it can be difficult to find exact match replacements, especially when the floor has been down for some time. There are a few companies that specialise in reproduction Victorian tiles however Quarry tiles don’t have a dedicated store or website where we can get matching tiles. In this case the client had scoured the internet and hunted down replacements which came close to matching the original.

Quarry Tiled Floor Lancaster During Repair
The first step in repairing a tiled floor is to carefully remove any damaged tiles and, in this case, there were quite a few. The exposed area is the cleaned of old adhesive and grout and the subbase is made good where required. Next the replacement tiles are laid onto a base of new rapid set flexible floor adhesive, I prefer to use a flexible adhesive as it will allow for any further moment in the floor. Once the adhesive had set the tiles were grouted in and we then left floor to fully set overnight.

Deep Cleaning a Quarry Tiled Floor in Lancaster

I came back the next day with our cleaning equipment and products to get the floor clean which should help blend the new tile in with the original.

I started by applying a strong dilution of Tile Doctor Pro-Clean to the Quarry tiles and then scrubbed it in with a rotary floor machine fitted with a black scrubbing pad. Pro-Clean is a strong and effective alkaline cleaner which is safe to use on Tile and Stone and unlike acid wont damage the clay. The cleaning solution soon turned black with the dirt that had been released from the old Quarry Tiles, so I gave the floor a rinse with water and extracted the soil with a wet vacuum.

The last job was to give the tiles a light acid rinse using Tile Doctor Grout Clean-Up, this isn’t a strong acid like the brick acid you find in DIY stores so it’s safe to use on most surfaces if it isn’t left for too long. The Grout Clean-up removes any old grout and minerals such as efflorescent salts from the Quarry tiles and is then rinsed off with water and extracted with the wet vacuum. The other advantage of giving the floor an acid rinse is it counters the alkaline cleaning products used earlier effectively neutralising the pH level of the tiles. Lastly the acid slightly etches the clay tile ensuring a much stronger bond with the sealer.

Sealing a Quarry Tiled Floor in Lancaster

The Quarry tiled floor was then sealed with Tile Doctor Colour Grow which is a matt sealer that impregnates the pores of the clay enhancing colour in the process and effectively adding protection to the tile from within.

Quarry Tiled Floor Lancaster After Repair
The quarry tiled floor looked much cleaner and fresher following the work, the cracked tiles were gone, and our customer was pleased with transformation we had managed to achieve.


Professional Restoration of an Old Quarry Tiled Floor in Lancashire

Old Quarry Tiled Floor Repaired and Renovated in Lancaster Read More »

Victorian Tiled Hallway Floor Before After Restoration Lancaster

Victorian Floor Tile Restoration Lancaster

We often get asked to restore old Victorian tiled floors which are generally over 100 to 150 years old and as I’m sure you can imagine they experience a lot of wear over that length of time.

Victorian floor tiles before restoration Lancaster

We recently visited a property with such a floor in Lancaster after the client got in touch looking to have their hallway floor tiles restored. We arrived to inspect the floor and could see straight away that it was looking a little tired and in need of care and attention. Some tiles had become loose and had broken apart, especially around the doorways. Also, this floor had suffered from subsidence in the past and this had created a crack line near the top end of the hallway which pushed up several of the tiles. We went through what could be done to restore it, the client agreed a price and we arranged a time to come back.

Cleaning and Repairing a Victorian Tiled Hallway Floor

My first task was to take the loose tiles up, grind the concrete screed back so it was as level as we could make it and then we needed to refit the tiles. Once all loose tiles were fixed, we left them to dry and cure.

Victorian floor tiles during restoration Lancaster

We then came back to start the main clean of the floor, we used Tile Doctor Diamond Burnishing pads for this, which bite in deep to the clay face and remove ingrained dirt far better than conventional alkaline cleaners can. We used a series of different grades of these diamond pads to get the finish we required and then rinsed with clean water once were finished, removing the slurry created with a wet vacuum.

Any areas we couldn’t reach with our weighted buffing machines we had to get on our hands and knees and use small handheld Diamond Blocks, using a bit of clean water and elbow grease, this is especially good on intricate edges and around doors and corners.

Victorian floor tiles during restoration Lancaster

The floor was given a quick rinse with water to remove any remaining clay resin and soil generated by the burnishing process. A wet vacuum is then used to extract the soil and remove as much moisture from the floor before being left to dry off fully overnight.

Sealing a Victorian Tiled Hallway Floor

Before we seal the Victorian Tiles, they looked very dull and washed out however this all changes once we apply the sealer. We checked the moisture levels in the floor which were fine. Our favourite sealer for this type of tile is called Tile Doctor Colour Grow, this is a fully breathable sealer which restores the colour lost in the cleaning process and allows for the floor to breathe, which is an absolutely necesity on an old floor without a Damp Proof Membrane where Efflorescence can be an problem.

Tile Doctor Colour Grow is an impregnating sealer that works by occupying the pores in the tile, so dirt cannot become ingrained there. It leaves a matt finish and enhances the colours in the tile bringing them to life, as you will see on the photos.

Victorian floor tiles after restoration Lancaster

For aftercare we always advise our customers to use Tile Doctor pH Neutral tile cleaner as it’s specially designed for cleaning sealed surfaces without damaging the sealer like cheap supermarket cleaners that contain anionic surfactants.

The client was very pleased with the restoration of her floor which is now in good physical condition and looks much brighter.


Professional Restoration of a Victorian Tiled Hallway in Lancashire

Victorian Floor Tile Restoration Lancaster Read More »

Semi Riven Slate floor Before and After Cleaning Hornby

Brazilian Grey/Green Semi-Riven Slate Floor Hornby Kitchen

Rough Slate is notorious for homeowners to maintain as dirt can quickly become trapped in the rough surfaces. The example on this page is that of Brazilian Semi Riven Slate installed in the Kitchen of a house in the village of Hornby, which while naturally cleft from the rock loses none of its texture and style and yet has a much smother appearance than the typical rough Slates from China. Less processing means it’s not quite completely smooth but it is a lot less expensive to buy than say a honed or polished Slate which is more difficult to maintain due to various polishing techniques required to keep up the appearance. Brazilian Slate is in fact one of my favourite slates to clean and also one of the most rewarding of Slates to seal as the sealer really does bring out the colour and character of the stone.

Sealers provide a protective barrier on natural stone floors and without it dirt can penetrate into the pores of the stone making it more and more difficult to clean effectively. Unfortunately on this floor the new homeowners were unaware on what sort of Stone it was and had no idea how to look after it which resulted in the sealer wearing down prematurely and the floor becoming dull and un-inviting.

Semi-Riven Slate floor Before Cleaning Hornby Semi-Riven Slate floor Before Cleaning Hornby

Cleaning Black Semi-Riven Brazilian Slate Tiles

To restore the appearance of the Slate floor we started by taping up the edges of the new kitchen units to protect the wood from splashing. This was followed with an application of a strong dilution of Tile Doctor Pro-clean worked in with a black buffing pad fitted to a buffing machine running at slow speed (working at a slower speed results in less splashing). The pads can struggle to reach the edges and corners so these were cleaned by hand.

Once we had finished on the main floor area we then concentrated on the grout using a steam cleaner and more Pro-clean scrubbed in with a narrow stiff brush.

Last step of the cleaning was to rinse the floor with water to remove any trace of cleaning products from the Slate and then dried off the floor the best we could with our high wattage wet vacuum machine and left the floor to dry off naturally over night.

Sealing Black Semi-Riven Brazilian Slate Tiles

The next day we returned to seal the floor checking first that the floor had completely dried. The customer had requested a matt finish however we have worked on Brazilian Slate many times before and we knew how good they can look with this Satin finish sealer. Naturally its the customers decision so we offered to do a test piece and let them decide if they didn’t like it we would strip off the test piece and apply a Matt finish sealer like Tile Doctor Colour Grow instead.

The floor was dry so a couple of coats of Tile Doctor Seal and Go were applied to one Tile so that they could appreciate how it would look. Luckily the customer agreed with us and so we set about sealing the whole floor with Seal and Go.

To speed up the drying process Air Blowers were installed as we worked and it wasn’t long before the sealer was dry and the customers were able to walk on the floor and inspect every area before we left. I’m please to report that they were over the moon with the floor and my recommendation of sealer.

Semi-Riven Slate floor After Cleaning Hornby Semi-Riven Slate floor After Cleaning Hornby

To maintain the slate tiles going forward we always give our customers a free bottle of Tile Doctor pH neutral tile cleaner, which is a little incentive for them to provide some feedback via our website.

Professional Semi Riven Slate Floor Renovation in Lancashire

Brazilian Grey/Green Semi-Riven Slate Floor Hornby Kitchen Read More »

Renovating Victorian Tiles at Lancaster Garage

Renovating Old Victorian Floor Tiles at a Lancaster Garage

We don’t get many requests to clean garage floors but this particular floor was quite old and tiled in black and red Victorian tiles. Many would have just washed it down with a hose pipe however this garage in the city of Lancaster housed a classic British built AC sports car which doesn’t like getting dust in its Carburettor’s and as a result the owner was keen to have the floor restored.

Lancaster Garage AC Sports Car
You can see from the photograph below the floor was in quite a state and as such the whole floor needed a thorough deep clean to remove the ingrained dirt and grease and then sealing to protect it.

Lancaster Garage Victorian Tiled Floor Before Cleaning

Cleaning a Victorian Tiled Garage Floor

With the exception of moving the vehicle little preparation was required and we soon got on with the job starting with the application of a strong dilution of Tile Doctor Pro-clean which is a great product for deep cleaning tile and grout. The solution was left to soak into the tile for ten or so minutes before being worked in with a buffing machine fitted with a black buffing pad. This soon lifted the dirt from the tile turning the cleaning solution into a dark fluid that was rinsed from the floor with water and extracted using a wet vacuum.

With old floors like these where no damp proof course has been installed it’s not unusual to get white salt marks appearing which leave a white bloom on the surface of the tile. This problem is known as efflorescence however it can be treated early on by giving the floor a wash with a strong acid which removes the salts. So the next step was to apply a Tile Doctor Acid Gel which being in gel form makes it easy to control once it’s on the floor, naturally acids are not good in general for any floor so it was not left on the tiles for too long before being extracted.

Last step was to give the floor a good rinse with water to remove any remaining trace of cleaning products before sealing, once this was done we used the wet vacuum to suck up as much moisture from the floor as possible.

Because of the water that was used, we had to let the floor dry out for several days before the sealer could be applied, this is especially relevant in the winter months when the water tables are high and thus a longer time is required for drying. Modern floors have a damp proof membrane so drying out can take twelve hours or less.

Sealing a Victorian Tiled Garage Floor

When we returned to seal the floor we first checked the floor was suitably dry by checking for dampness using a damp meter. The readings were good so several coats of a breathable sealer called Tile Doctor Colour Grow which has a matt finish was applied. I should mention that Colour Grow has good VMT (Vapour Moisture Transmission) properties that will ensure any trapped moisture can rise up through the tile and sealer, it also lifts the colours of the clay and gives its a deeper hue, in fact its one of our most popular sealers for these tiles. Having good VMT properties also means that is , Also if efflorescence do come back, the sealer allows the substance to breathe through and you can just wash off the crystals with a wetted mop.

Lancaster Garage Victorian Tiled Floor After Cleaning
Last photo is of the car being parked in the garage by the owner, happy in the knowledge his prized possession is now living in a clean environment.

Lancaster Garage Victorian Tiled Floor After Cleaning
 

Restoring a Victorian Tiled Floor

Renovating Old Victorian Floor Tiles at a Lancaster Garage Read More »

Victorian floor Tile Vestibule Lancaster Before and After

Victorian Tiled Hallway Restored to New in Lancaster

Sometimes we get asked to do restore very small areas of tiles, while more usually we will restore large area of up to 30 metres squared. However, we don’t mind adding small jobs to our busy schedule, especially if it helps homeowners who are struggling to keep their tiles looking great.

Victorian floor Tile Vestibule Lancaster Before
A recent example of this was a small Victorian tiled doorway we restored at a property in Lancaster. It clearly had not seen a thorough clean or a fresh seal in a while, but with the right Tile Doctor cleaning products and methods. I knew I could restore its appearance very simply.

Victorian floor Tile Vestibule Lancaster Before

Cleaning a Dirty Victorian Tiled Doorway

It doesn’t take that long to restore a small floor, but it still needs to be cleaned and sealed over two days. This is because we use a very strong cleaning system which involves chemicals that need to be rinsed away, and the tiles need to dry completely before we apply the sealer.

Our process for cleaning Victorian tiles involves firstly the application of Tile Doctor Remove and Go to strip away any old and no longer effectual sealers. This exposes the stone and allows the cleaning products to penetrate and eliminate ingrained dirt and stains. Normally we would do this with a black scrubbing pad fitted to a rotary machine however in this case due to the space restrictions it was easier to do it by hand with a scrubbing brush.

The tiles quickly began to regain their original character once the years of muck had been removed, but to complete the restoration they would also need to be sealed. First, however, they were left to dry completely overnight.

Sealing a Victorian Tiled Doorway

The next day, the Victorian tiles were ready to be sealed. Since there was was no damp proof membrane (DPM) present in the floor we need to use a fully breathable sealer and so for these tiles we used Tile Doctor Colour Grow to seal the tiles.

As a fully breathable sealer, Colour Grow will help ensure that the tiles won’t be affected by issues such as efflorescence where your left with white salt deposits on the surface of the tile, or damp issues which are very common with these old floors (the DPM is after all a fairly modern invention!)

Victorian floor Tile Vestibule Lancaster After
I’ve included a few photos to show the huge difference made over a couple of days. We’re always happy to restore these fantastic Victorian tiled floors, regardless of size and I have to say this customer was very happy with the results here.

Victorian floor Tile Vestibule Lancaster After
 

Professional Victorian Tiled Floor Restoration in Lancashire

Victorian Tiled Hallway Restored to New in Lancaster Read More »

Indian sandstone floor Lancashire after restoration

Milling and Sealing a Large Indian Sandstone Tiled Floor Near Lancaster

Here we have a six year old Indian Sandstone tiled floor located a property on the outskirts of Lancaster. Measuring 100 metres squared, the very large floor had under floor heating in the concrete sub base. The type of stone used inside the property is what we commonly refer to as ‘patio Sandstone’, a material which is usually used outside because of its very rough texture. It’s not particularly comfortable to walk across in bare feet, hence why many people consider it be impractical for internal flooring.

Indian sandstone floor Lancashire before restoration
Nonetheless, the property owner was keen to make the rough textured floor as feet-friendly as possible for people walking over it. At Tile Doctor we have developed a process known as milling, which utilises diamond encrusted pads combined with a weighted rotary machine to smooth the rough surface, leaving it looking and feeling a lot nicer and more practical to live with. The milling process is only done once, but while the Sandstone will still need cleaning and sealing in the future, it won’t be nearly as difficult as when it was rough.

The job would take over two weeks to complete due to the fact that the existing grout needed to be removed and replaced with a flexible floor grout: a very time consuming process.

Milling an Indian Sandstone Tiled Floor

As mentioned, the surface of the Sandstone was very rough, and so needed to be milled down to make it a lot smoother to look after and make it easy to clean and seal. This was achieved by using Tile Doctor’s 50 Grit diamond encrusted burnishing pads, fitted to a weighed rotary machine and run along the entire surface area of the floor. Through this process the stone became much smoother and more aesthetic – completing one of our main objectives for the customer.

Indian sandstone floor Lancashire during restoration
Next, we started breaking out the already loose and badly applied grout with our grout removal tools. The builder who had installed the floor had used a sand/cement-based grout which wasn’t flexible. As a result, it started to crumble and loosen quite quickly after exposure to the underfloor heating. We removed this and replaced it with a far more flexible grout.

Indian sandstone floor Lancashire during restoration

Sealing an Indian Sandstone Tiled Floor

Once the whole area had been successfully milled and the grout replaced, the Sandstone floor was left to dry out over the weekend. Upon our return to the property, we cleaned off any dust and resin left over from the milling and grouting processes, before leaving it to dry for a further 24 hours.

Indian sandstone floor Lancashire after restoration
The next day we returned to seal the whole floor with two coats of our impregnating sealer Tile Doctor Colour Grow. The sealer fills the pores of the Sandstone to prevent ingrained dirt and stains, while also emphasising the natural colours in the stone. It also provides a robust matte finish, which is what the customer wished for.

Indian sandstone floor Lancashire after restoration
It wasn’t the easiest of processes to get the Indian Sandstone into a condition where it would be both suitable for internal flooring and aesthetically pleasing, but the results proved to be very much worth the time and effort invested. The customer was very pleased with the transformation.

Smoothing, Regrouting and Sealing a Rough Indian Sandstone Tiled Floor in Lancashire

Milling and Sealing a Large Indian Sandstone Tiled Floor Near Lancaster Read More »

Ceramic Bathroom Tile and Grout Cleaned with Mould Away in Galgate

Cleaning and Sealing a Mouldy Ceramic Tiled Shower in Galgate

If you have a tiled shower area in your home, it’s very likely you’ve experienced problems with the grout becoming excessively dirty and ridden with displeasing black spots of mould. The underlying issue is due to inadequate ventilation which can be a real problem in modern insulated houses and occasionally the grout can get so imbued with contamination that the problem needs to be resolved professionally.

Ceramic Bathroom Tile and Grout Cleaned with Mould in Galgate
In the case of this Ceramic tiled shower area, located at a property in Galgate, Lancashire, mould had turned the grout black and had got into the sealant strip around the base. The property owner had tried using the run-of-the-mill cleaning products you can buy in superstores, but they simply couldn’t get the job done. So, she contacted me to see what could be done.

Cleaning Mouldy Ceramic Shower Tiles

At Tile Doctor, we come across the problem of mouldy shower tiles very often. Excess soaps and shampoos – many of which contain chemicals that harmful to the grout – can quickly build-up if not removed, causing mould and soap scum to emerge quickly, and before you know it, you have a problem like this one.

Thankfully, with the right strength product and cleaning methods, mould can be removed quite easily. The cleaning product used here was Tile Doctor Mould Away, which does what it says on the bottle and can quickly remove mould and black spots from grout and silicone. I applied Mould Away to the grout and surrounding Ceramic tiles and left it to dwell for a short period, before starting to clean the affected areas carefully using soft nail brushes and a small amount of water.

Ceramic Bathroom Tile and Grout Cleaned with Mould in Galgate
Sometimes it is necessary to repeat this process several times to achieve the best possible results, but in this case two attempts was all it took to get the grout looking like new once again.

Ceramic Bathroom Tile and Grout Part Cleaned with Mould Away in Galgate

Sealing Grout

Following the cleaning, the area was rinsed thoroughly with water, before bring dried off quickly with a heat gun on a low setting. I then sealed the grout with a single coat of Tile Doctor Wall Grout Sealer, which is a water-based sealer designed to protect against water, oil and acid-based contaminants, and stop them from spoiling the appearance of the grout. It also provides a transparent finish that does not diminish the original colouring of the grout. To add the finishing touches, I polished off the Ceramic tiles as these were already fully glazed and did not require any extra sealer.

Ceramic Bathroom Tile and Grout Cleaned with Mould Away in Galgate
The before and after photos are a testament to how significantly the condition and appearance of the grout was quickly improved and needless to say, the customer was very satisfied with the result.

Ceramic Bathroom Tile and Grout Cleaned After Cleaning Mould Away in Galgate
 

Dealing with Mouldy Grout and Sealant in Lancashire

Cleaning and Sealing a Mouldy Ceramic Tiled Shower in Galgate Read More »

Honed Travertine Lancaster After

Resolving Honed Travertine Tiled Floor Installation Problems in Lancashire

This honed Travertine tiled floor was newly laid by a professional tiler in South Lancaster, unfortunately however the tiler mistook some white lines in the stone as resin post installation and tried very hard to remove them damaging the finish of the stone (it’s quite common for new stone to have this issue). The white marks turned out be in the stone itself and not on the surface, to complicate things further the Travertine had been laid onto electric under floor heating so it would have been tricky to lift and replace the tiles without compromising the expensive heating matts placed underneath the stone.

The customer was left in a dilemma as the suppliers of the stone were blaming the tiler and the tiler the supplier, the only option was to call out Tile Doctor. On inspection and after conducting two cleaning tests we managed to get a result with our burnishing system with no white lines showing after the Travertine had dried out.

Honed Travertine Lancaster Before

Stripping and Re-Polishing Travertine

To get the Travertine looking new again we had to strip back the surface of the tile using a set of Diamond Encrusted burnishing pads fitted to a rotary machine. You start with a coarse stripper pad with water to strip back the surface and then move onto the finer pads to polish the floor. We also use some grinding discs to remove scratches left behind by the kitchen fitters who were clumsy when fitting the kitchen.

Once I was happy that all the problems had been resolved with the Travertine tile we resealed it using two coats of Tile Doctor Colour Grow to get a nice overall finish for the floor. Colour grow is a great sealer to use on natural stone as now only will it offer good stain protection it brings out the colours in the stone.

Honed Travertine Lancaster After
 

Honed Travertine Tiled Floor Problems resolved in Lancaster

Resolving Honed Travertine Tiled Floor Installation Problems in Lancashire Read More »

Silver Pearl Milled Slate Lancaster After Cleaing and ReSealing

Cleaning and Milling Silver Pearl Pearlescent Slate floor in Lancaster

Previously I had solved a lippage problem on this customers Limestone kitchen floor where the tiler had laid the tiles unevenly and they had asked me to remove and level the edges which we can do with diamond encrusted burnishing pads. I sorted that out and they asked me back to look at their Conservatory floor as well which was a Silver Black Pearlescent Slate, again laid with lippage but the slate had also been oiled prior to sealing causing it to loose all its Silver colouring making it look black all over. It was at this point the customer shared the whole story of how the floor had been laid when she had been away on her holidays and had trusted the Tiler to do a good job; unfortunately he hadn’t and was unable to correct the problem. The floor was left in a sad and sorry state for a number of years and the owner unhappy with the floor had to cover most of the floor in rugs so she wouldn’t trip on the lippage. It probably would have stayed that way until one day they noticed my Tile Doctor Van in a Lancaster car park where they stopped me so to get my business card.

Silver-Pearl-Milled-Slate-Lancaster-Before-Cleaing.jpg
So a few days later I called round to assess the problem and came up with a solution; I offered to Mill the whole floor with Diamond segments using burnishing pads and just to prove my faith in this system to help solve her floor issues, I moved the settee away and proceeded to Mill a small section, after rinsing with water and Vaxing the waste up, the customer was delighted with the results, not only had the rough lippage disappeared but she could see the Silver Pearlescent colour shine through the Black Slate, which is exactly why she bought the Tiles. We think the Tiler oiled the floor to darken it so you couldn’t see what a bad job he had done on laying the tiles, unfortunately this didn’t stop people tripping over them.

The great thing about milling a stone tile is it actually improves the look not diminish it, unlike wood the more it’s worked at the better it will look. I spent an extra day on this floor to get it right for the customer and the results were very satisfying for us both especially after I had put down several coats of Tile Doctor Seal and Go on The Slate to lift the colours in the stone and also add a sheen to the tiles as well.

Silver-Pearl-Milled-Slate-Lancaster-After-Cleaing-and-ReSealing.jpg
I always mention to my customers the importance of using a nuetral cleaner like PH Neutral cleaning product for aftercare cleaning and not to use a bleach based cleaning product like flash, Domestos etc, or even Washing up Liquid which is slightly Acidic; all these will damage a stone sealer given time and diminish it’s protective qualities.

Cleaning and Milling Silver Pearl Pearlescent Slate floor in Lancaster Read More »

Milled Sandstone Floor Lancaster After

Rough Sandstone floor milled in Lancaster

Sandstone is generally a rough textured surface requiring regular cleaning and sealing to keep it looking good, I’ve also known customers to complain that the rough texture can shred mops during regular cleaning. This Sandstone tiled floor installed in a house in Lancaster was no different and so with the owner’s approval we decided to gently grind the sandstone to produce a smoother more manageable surface. At Tile Doctor we refer to this process as Milling and it’s especially useful for flattening a raised surface between tiles often called lippage.

Sandstone Floor Lancaster Before Milling Sandstone Floor Lancaster Before Milling

Milling and Sealing a Sandstone Tiled Floor

As far as I know Milling was developed at Tile Doctor to basically smooth down a rough textured surface to make it easy to clean, seal and maintain; it’s a one off process and is akin to sanding down a rough piece of wood with sandpaper. We don’t use sandpaper for this purpose but diamond encrusted burnishing pads which like sandpaper come in different levels of coarseness. Milling actually reveals more of the character in the surface of the stone which is further enhanced during sealing for which recommend the use of a matt finish sealer such as Tile Doctor Colour Grow or if there is still a bit of texture in the stone we recommend the use of a topical sealer such as Tile Doctor Seal and Go which also leaves a nice low sheen finish.

Milled Sandstone Floor Lancaster After Milled Sandstone Floor Lancaster After

The customer was on holiday when the work was done but was so pleased with the effect of the milled Sandstone floor she rang me up personally to say thanks and left the comment below on the Tile Doctor feedback system, she was experiencing a lot of trouble cleaning this floor and we managed to resolve that and still keep the texture and character of this beautiful floor.

“Total transformation of our floor. Can’t quite believe the results. No mess and an amazing result. Thank you v much
D. Rix, Lancaster”

Smoothing a Rough Textured Sandstone Floor in Lancashire

Rough Sandstone floor milled in Lancaster Read More »

Sandstone floor Stodday after

Sandstone floor maintained in Stodday, Lancashire

This sandstone floor was installed in a house in the village of Stodday, Lancashire, the floor was looking dull and if you look closely you should be able to see surface staining, there were also a number of marks the customer was eager for us to deal with.

Sandstone floor in Stodday before Sandstone floor in Stodday before

Cleaning Sandstone

We cleaned the floor using Tile Doctor Pro-Clean diluted with 10 parts warm water and worked in using a Black Scrubbing pad. This action certainly gave the floor a good clean but the marks mentioned earlier were proving stubborn to shift so we tried a stronger product called Remove and Go combined 50/50 with NanoTech UltraClean which add nano sized abrasive particles. We left the resulting formula to soak into the stone for about an hour and then used a steam cleaner to penetrate deep into the pores of the stone and lift out the dirt, this did the trick and so we then removed the cleaning products with a wet vacuum and washed down the floor with clean water to neutralise the floor before sealing and left for the evening so the floor could dry overnight.

Sandstone floor in Stodday after

Sealing a Sandstone Tiled Floor

We came back the next day and tested the floor with a damp meter in a few different locations to make sure no dampness remained in the stone. The sandstone was dry so we proceeded to seal the floor with Tile Doctor Seal and Go which gives a nice low sheen finish, Sandstone is fairly porous so it took five coats of sealer in the end. Seal and Go is a topical sealer and really brings out the true colour of the Stone and also leaves them a lot easier to clean with a mop as it takes a lot of the rough texture out of the stone.

Sandstone floor in Stodday after
 

Sandstone Floor Cleaned and Sealed in Lancashire

Sandstone floor maintained in Stodday, Lancashire Read More »

Quarry Tiled Floor After Restoration

Quarry floor restored in Borwick, Lancashire

This Quarry tiled floor is installed in a house that was built circa 1920, well before the invention of damp proof course. Although there was no evidence of damp there was quite a bit of old plaster, trapped dirt and pain splashes on the quarry tiles, the photograph below gives you a good idea of the state it was in.

Quarry Tiled Floor Before Restoration

Cleaning Quarry flagged flooring

We cleaned the Quarry tiles first with a strong solution of Tile Doctor Pro-clean which improved the floor but struggled to shift the stubborn areas. Something stronger was required to we applied Tile Doctor Grout Clean-Up on the Plaster and Grout followed by a small amount of Tile Doctor Remove and Go to get rid of the Paint Splashes. The floor was then rinsed down with clean water which was then vacuumed off the floor using a wet vacuum and left it to dry overnight.

Quarry Tiled Floor Before Restoration

Sealing Quarry floor tile

The next morning we used a damp meter to verify the floor had dried sufficiently for sealing, it’s always possible to hurry this along with an industrial fan or heat gun for small areas. In this case the floor was fine and we proceeded to seal it using four coats of Tile Doctor Seal and Go which results in a nice low sheen finish as well as providing lasting stain protection, four coats of Seal and Go were needed to seal the Quarry Tiles.

Quarry Tiled Floor After Restoration Quarry Tiled Floor After Restoration

I think you will agree the floor looks transformed.

Restoring a Quarry Tiled Floor in Lancashire

Quarry floor restored in Borwick, Lancashire Read More »

Flagstone Floor After Cleaning

Flagstone Floor in a Victorian House in Lancaster

Restoration of Flagstone Floor in the Kitchen

Details of an original Flagstone Floor cleaning job below from a Victorian House in the City of Lancaster, we often find flagstone floor tiles in kitchens and hallways and in this case they were in the hallway. You can see from the photographs below that the flagstone floor tiles were in a very bad state and it became clear that no amount of cleaning was really going to remove the decades of trapped dirt embedded in the pores of the Sandstone.

Flagstone Floor Before Cleaning Flagstone Floor Before Cleaning

Cleaning the Flagstone Floor

To get over this problem it was necessary to remove the top surface of the flagstone using a milling pad together with a small amount of Tile Doctor Pro-Clean. The flagstones were then washed down with water which was then removed using a wet and dry vax machine. There was no damp proof course under the tiles so I left it to dry for a week before coming back to seal.

Flagstone Floor After Cleaning Flagstone Floor After Cleaning

Sealing and Restoration of Flagstone Floor

The milling process had opened up the pores in the sandstone flagstone floor tile so to seal it I used 1 coat of Tile Doctor Colour Grow in order to bring out the colour in the stone and then topped this off wth a further 3 coats of Tile Doctor Seal and Go.

Flagstone Floor Restoration in Lancaster

Flagstone Floor in a Victorian House in Lancaster Read More »

Victorian floor in Lancaster showing tile covered by Carpet

Victorian Floor in Lancaster

Victorian Floor Restoration in Lancaster

Details below of a Victorian Floor in the hallway of a house in Lancaster which the owner wanted restoring after it was discovered in poor condition under a carpet.

Removing the Carpet from the Victorian Floor

We removed the old carpet and applied a 50/50 mix of Remove and Go and Nanotech Ultra-clean which we left to soak for a couple of hours. We then cleaned the floor with a Steamer to remove all the dirt and muck and get any old sealer and waxes etc. to rise to the surface ready for a final rinse down.

Victorian floor in Lancaster showing tile covered by Carpet Victorian Floor Exposed under carpet
Victorian floor in Lancaster showing tile covered by Carpet Victorian floor Restoration in Lancaster after Carpet Removal

Victorian floor in Lancaster showing tile covered by Carpet

A number of Victorian Tiles where either broken or missing so some tiling work was in order before work could continue.

Victorian floor Restoration in Lancaster after cleaning Victorian floor Restoration in Lancaster after Sealing

Victorian floor Restoration in Lancaster after cleaning and then sealing

Sealing the Victorian Floor

The floor was cleaned again for a final time and left to dry thoroughly before applying the sealer. For Victorian Floors we always recommend Seal and Go which is a water based sealer and gives a nice low sheen, provides definition and lifts the colours to the surface.

Victorian Floor Restoration in Lancaster

Victorian Floor in Lancaster Read More »

Bathroom Grout Colouring After

Lancaster Grout Colouring

Grout Colouring a Ceramic Floor in Lancaster

Here are some details of a small 4m2 Tile Cleaning and Grout Colouring job we did in a shower room in Lancaster. The tiles were recently laid and unfortunately the 5mm wide grout had discoloured because the tiler had used the same bucket to mix the adhesive with and some of the remnants from that had got into the grout mix. If the tiler had used a separate bucket this wouldn’t have happened. The tiler didn’t know what to do to rectify the problem so Tile Doctor got the call. He had done a good job on the rest of the bathroom and the customer didn’t want to upset him over it any further so she was quite happy to pay me to sort the problem out, as long as it didn’t look false.

Ceramic Tiled Bathroom floor before Grout Colouring
Before Grout Colouring

First I cleaned the grout with the pre-treater spray that comes with the kit and washed off the excess with water. Although the directions recommend leaving the grout to dry for 2 hours I left it for 30 minutes followed by a blast from my heat gun to dry any dark wet spots, this speeds up the process immensely.

Applying the Grout Colouring

Next I applied the Grout Colourant, fortunately the tiles were ceramic and the excess grout colourant came off the tiles very easily where I had got some on by accident. The kit came with a special white abrasive cloth which is excellent at removing excess grout colourant from the tiles. I often find unglazed tiles or stone and even some porcelain tiles are slightly porous on the surface and if the grout colourant gets on to these tiles then it can be quite hard to get off. I find it’s always best to do a test first on a couple of rows, if you get any on the tiles, don’t leave it on for more than 10 to 15 minutes as it sets very hard. Porous stones should always be sealed beforehand as it will make them a lot easier to clean. Its worth noting that the Grout Colourant acts as a barrier and so will never need to be sealed, it’s also completely washable.

Bathroom Grout Colouring After
Tiled Ceramic Floor after Grout Colouring

Grout Colouring a Ceramic Tiled Bathroom floor in Lancaster

Lancaster Grout Colouring Read More »

=================================

Lancashire Tile Doctor

================================= Read More »

Scroll to Top