ceramic tiles

Sandstone Floor Grout Before After Restoration Ulverston

Grout Colour Restoration on a Ceramic Kitchen Floor Ulverston

This client got in touch to see if we could clean the grout in her large kitchen floor which was tiled with Terracotta style Ceramic tiles. As per usual we visited the property first which was in the market town of Ulverston to survey the floor and get a better idea of what was required.
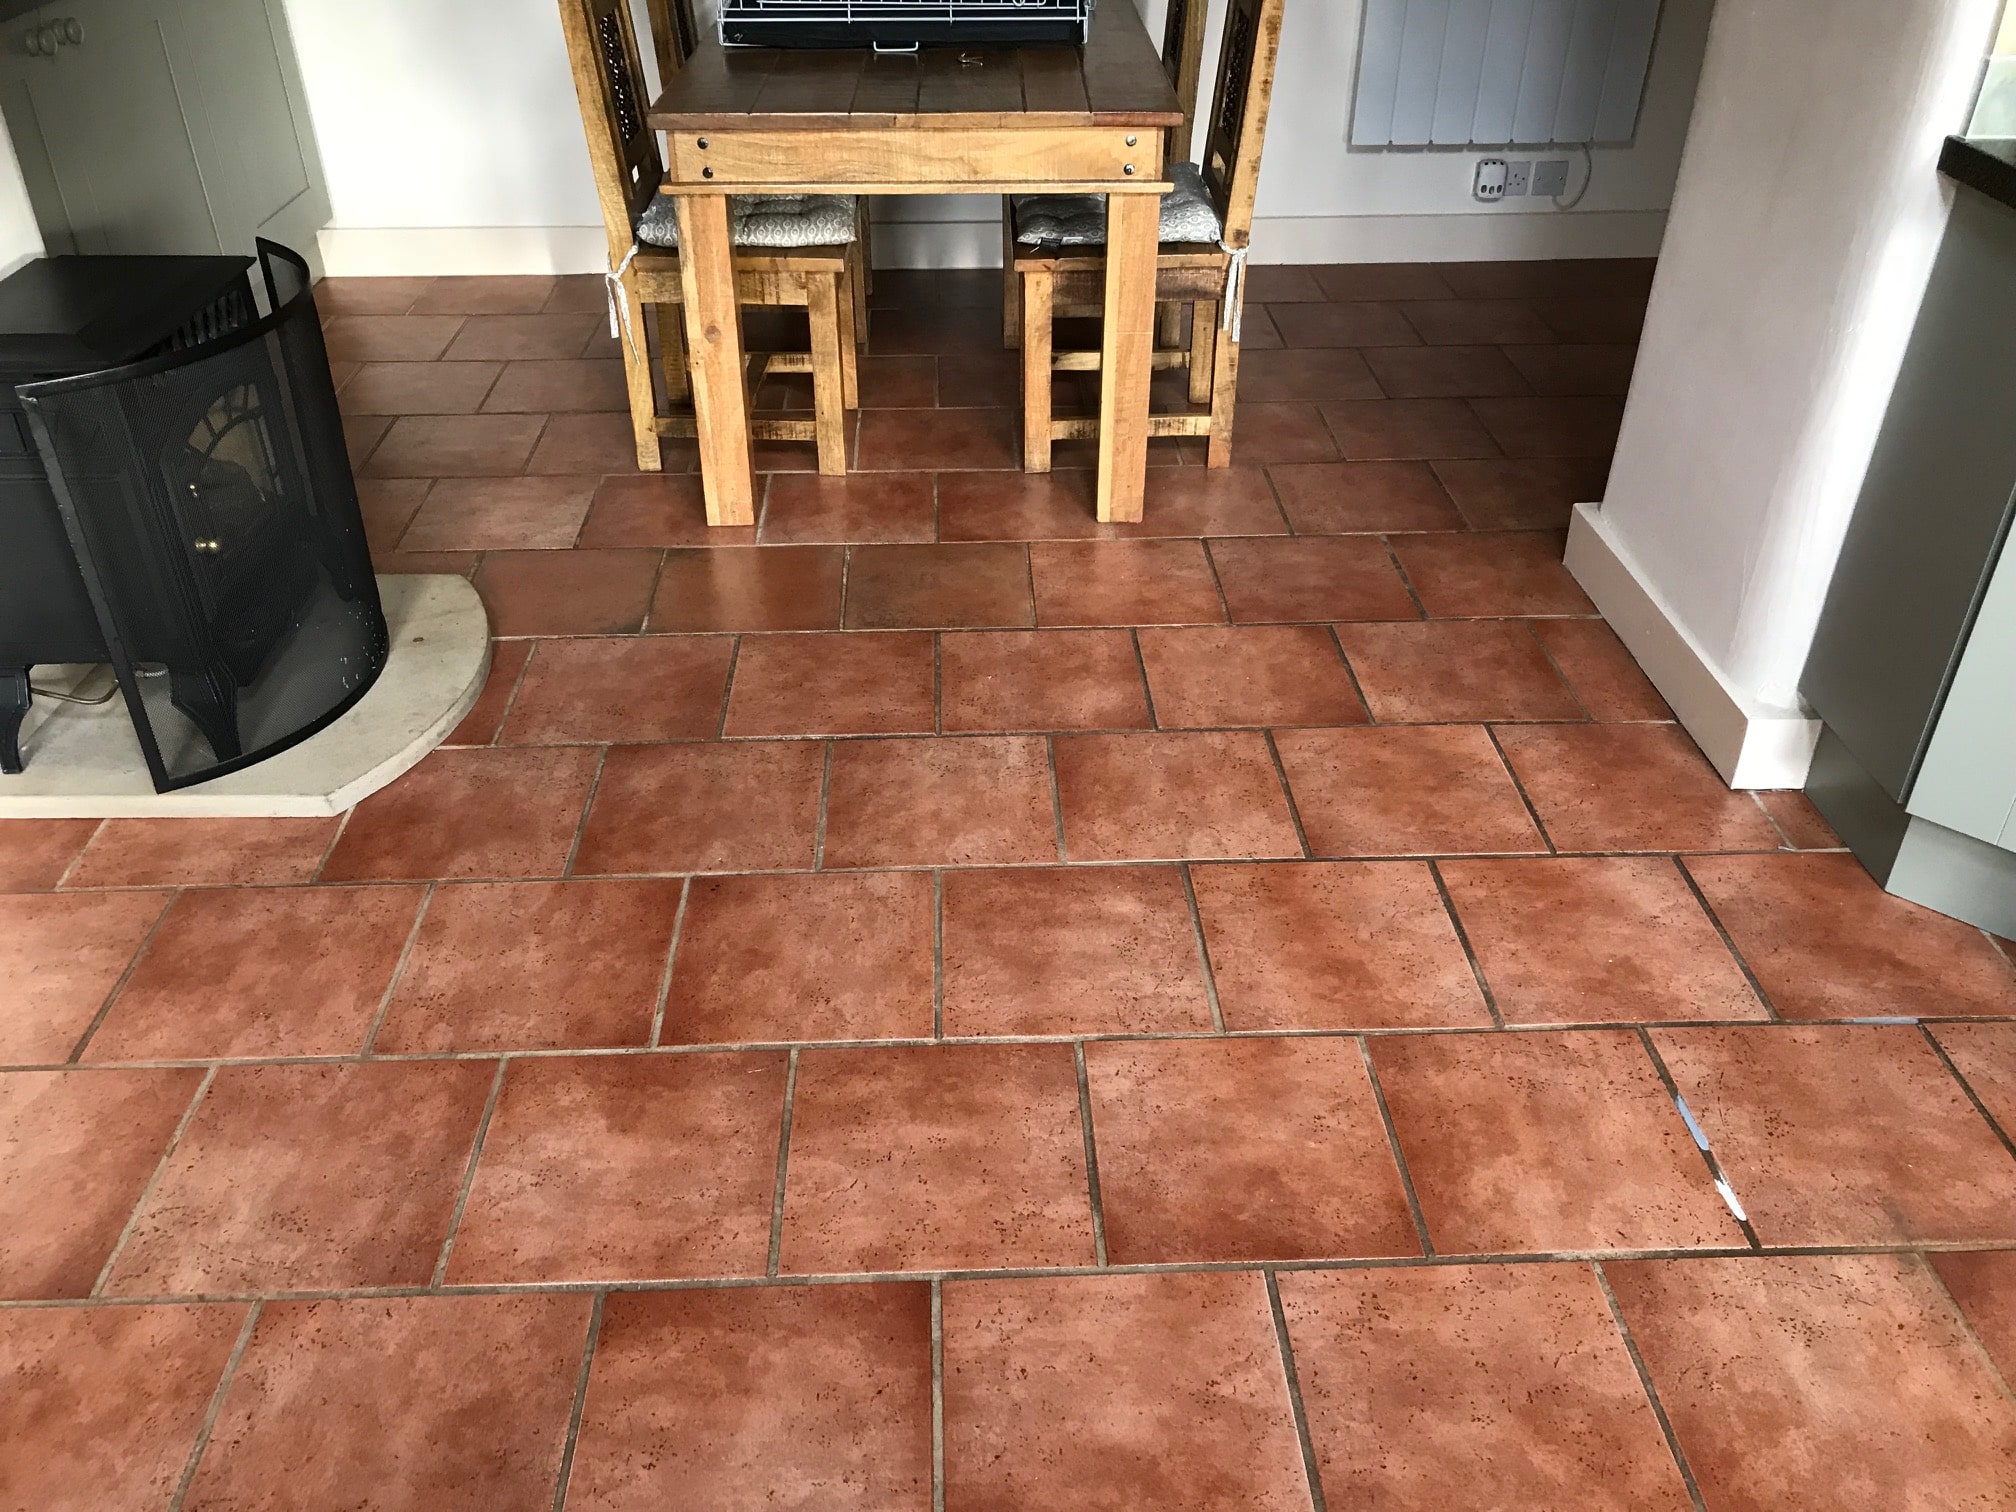
Ceramic Tiled Kitchen Floor Before Grout Colouring Ulverston

Believe it or not the grout had originally been Sandstone in colour, but poor cleaning practices had reduced the colour back to grey as all floor grouts (apart from white) are basically a cement grey with a colour dye added. I suspect the customer had been using a strong bleach-based product to clean the floor with which as well as removing colour can also lead to dehydration resulting in cracking. It’s work knowing that even the “Green Cleaning Products” on the market generally contain at least 5% of “non-ionic surfactants” which can also impact grout with constant use.

Ceramic Tiled Kitchen Floor Before Grout Colouring Ulverston Ceramic Tiled Kitchen Floor Before Grout Colouring Ulverston

Our recommendation was to re-colour the grout using a durable Tile Doctor Grout Colourant which seals and rejuvenates existing grout and is available in ten popular colours. The client was happy that we could improve the appearance of the floor, we agreed a price and scheduled the work in which would take two days to complete.

Cleaning and Colouring Grout on a Ceramic Tiled Kitchen Floor

It was a large 45m2 kitchen and so it took most of the first day just to clean the grout using Tile Doctor Grout Colourant Pre-Treater. This is an effective ready-to-use acidic cleaner which is designed to lightly etch and clean the grout joints so that you achieve a superior bond with the colourant. The product comes in a spray bottle so its just a question of spraying it onto the tile, leaving it for five minutes and then scrubbing it in with a brush. Afterwards you rinse it off with water and extract with a wet vacuum.

We worked our way across the large floor area in sections leaving an air blower in place over the completed section to accelerate the drying process. Once we managed to get a cleaned area dry, we started to apply the first coat of Grout Colourant. The colourant is relatively easy to apply with a small brush, you just need to ensure that any excess that gets on the tile is wiped off before it dries.

Once the second of coat of grout colourant had been applied and had dried the floor was inspected and touched up further where required. Before leaving we gave the floor a dry polish with our buffing machine just so it all looked spick and span before we handed the floor back to the customer. There was no need to seal the floor, Ceramic tiles won’t accept a sealer and the grout will now be protected by the colourant which acts like a barrier.

Ceramic Tiled Kitchen Floor After Grout Colouring Ulverston Ceramic Tiled Kitchen Floor After Grout Colouring Ulverston

The transformation to the floor was huge as you can see in the pictures. My customer was over the moon with the results and left the following feedback:

‘I can recommend the professional services of Russell and team, nothing was too much trouble and the job was completed on time with excellent results’
Karen. Ulverston

Ceramic Tiled Kitchen Floor After Grout Colouring Ulverston


Professional Grout Restoration of a Ceramic Tiled Kitchen Floor in Lancashire

Grout Colour Restoration on a Ceramic Kitchen Floor Ulverston Read More »

Ceramic Bathroom Tile and Grout Cleaned with Mould Away in Galgate

Cleaning and Sealing a Mouldy Ceramic Tiled Shower in Galgate

If you have a tiled shower area in your home, it’s very likely you’ve experienced problems with the grout becoming excessively dirty and ridden with displeasing black spots of mould. The underlying issue is due to inadequate ventilation which can be a real problem in modern insulated houses and occasionally the grout can get so imbued with contamination that the problem needs to be resolved professionally.

Ceramic Bathroom Tile and Grout Cleaned with Mould in Galgate
In the case of this Ceramic tiled shower area, located at a property in Galgate, Lancashire, mould had turned the grout black and had got into the sealant strip around the base. The property owner had tried using the run-of-the-mill cleaning products you can buy in superstores, but they simply couldn’t get the job done. So, she contacted me to see what could be done.

Cleaning Mouldy Ceramic Shower Tiles

At Tile Doctor, we come across the problem of mouldy shower tiles very often. Excess soaps and shampoos – many of which contain chemicals that harmful to the grout – can quickly build-up if not removed, causing mould and soap scum to emerge quickly, and before you know it, you have a problem like this one.

Thankfully, with the right strength product and cleaning methods, mould can be removed quite easily. The cleaning product used here was Tile Doctor Mould Away, which does what it says on the bottle and can quickly remove mould and black spots from grout and silicone. I applied Mould Away to the grout and surrounding Ceramic tiles and left it to dwell for a short period, before starting to clean the affected areas carefully using soft nail brushes and a small amount of water.

Ceramic Bathroom Tile and Grout Cleaned with Mould in Galgate
Sometimes it is necessary to repeat this process several times to achieve the best possible results, but in this case two attempts was all it took to get the grout looking like new once again.

Ceramic Bathroom Tile and Grout Part Cleaned with Mould Away in Galgate

Sealing Grout

Following the cleaning, the area was rinsed thoroughly with water, before bring dried off quickly with a heat gun on a low setting. I then sealed the grout with a single coat of Tile Doctor Wall Grout Sealer, which is a water-based sealer designed to protect against water, oil and acid-based contaminants, and stop them from spoiling the appearance of the grout. It also provides a transparent finish that does not diminish the original colouring of the grout. To add the finishing touches, I polished off the Ceramic tiles as these were already fully glazed and did not require any extra sealer.

Ceramic Bathroom Tile and Grout Cleaned with Mould Away in Galgate
The before and after photos are a testament to how significantly the condition and appearance of the grout was quickly improved and needless to say, the customer was very satisfied with the result.

Ceramic Bathroom Tile and Grout Cleaned After Cleaning Mould Away in Galgate
 

Dealing with Mouldy Grout and Sealant in Lancashire

Cleaning and Sealing a Mouldy Ceramic Tiled Shower in Galgate Read More »

Applying Anti Slip Treatment to Ceramic tiles in Lancaster After

Application of Anti-Slip Treatment at an Office Block

We recently had a request to take a look at the Ceramic floor tiles installed at a fairly new office building in Lancaster. Well over 300 people work at the builder and they all come and go via the entrance hall where ceramic tiles have been installed which when wet were very slippery. To confirm this we conducted a pendulum test which is a specially designed piece of certified equipment that measures the surface co-efficient of friction which basically is a recognised measure of how much traction a surface has. The testing is very detailed and the output is an official report that can be used for insurance purposes; the report came back high risk which was expected so no surprise there, the next step was to see how this could be improved.

Applying Anti-Slip Treatment to Ceramic tiles in Lancaster Before

Cleaning Porcelain Tiles ready for Anti-Slip treatment

As well as maintaining Tile and Stone Tile Doctor are also trained in the application of Anti-Slip treatments so we were asked to apply Anti-Slip to the 36m2 of Ceramic tiles in the entrance and rectify the problem. We do this by first getting the floor as clean as possible for which we use a dilution of Tile Doctor Pro-Clean worked into the floor with a rotary machine fitted with a scrubbing pad. The dirty cleaning solution is removed using a wet vacuum and the floor rinsed with clean water.

Applying Anti-Slip treatment to Porcelain tiles

The second step is to apply a Priming and Locking solution which is part of the treatment diluted one part solution to four parts water. This is then left to dry and once dry is followed by the application of the Anti-Slip treatment itself.

The third step in the treatment is to re-apply the diluted Priming and Locking solution before the floor fully dries out and it’s this last step that activates the treatment and locks it in place. There’s no need to wait for the floor to dry at this point it can be used immediately after the last step has been applied.

Applying Anti-Slip Treatment to Ceramic tiles in Lancaster During
Once completed we conducted another Pendulum test so this could be compare to the original test to see if there had been any improvement. I’m glad to report the treatment worked as expected and the latest report came back as low risk. The customer keeps this to prove to any potential insurance claimant that steps had been taken to make the floor as safe as possible. You might notice that floor looks much better as well.

Applying Anti-Slip Treatment to Ceramic tiles in Lancaster After
I should mention that the work was carried out outside of working hours so no disruption was made to the normal operation of the building.

Surface Friction improvement at Derbyshire Golf Club

Application of Anti-Slip Treatment at an Office Block Read More »

Shower Cubicle Silverdale After

Cleaning a Ceramic Tiled Shower Cubicle in Silverdale

This ceramic tiled shower cubicle was installed at house in Silverdale, you can see from the photographs below that there was staining from the chemicals in domestic products and there was also a build-up of mould on some parts of the grout and silicone sealant. Mould can get a grip here due to a porous top layer and this is especially a problem in the UK where bathrooms tend to be small with inadequate ventilation.

Shower Cubicle Silverdale Before Shower Cubicle Silverdale Before

Cleaning Tile and Grout

The ceramic tiles and grout was treated using Tile Doctor Oxy Pro which is a ready to use tile and grout shower cleaner that comes with a trigger spray attachment which allows the cleaner to mix with air making it lighter and allowing it to stick to vertical surfaces. It was then worked in using a stiff scrubbing brush by hand before being rinsed off with water; this process was repeated a number of times until we had managed to clean all the areas and then left to dry.

Unfortunately it’s not possible to remove mould from silicone sealant, the only solution is to have it stripped off and replaced. Once this was done the edges were cleaned up and fresh mould resistant silicone was applied.

It’s worth mentioning at this point that silicone will last longer if the residue from soaps, shampoos and body washes etc. are rinsed away with clean water after having a shower as it’s the chemical and not the water that damages the silicone in the first place.

Shower Cubicle Silverdale After Shower Cubicle Silverdale After

The results are plain to see and my customer was very satisfied with the work.

Prevention is always better than the cure and another tip you might find useful is to improve ventilation which is a major problem with draught free modern housing fitted with insulation and double glazing, if this is not possible try leaving your shower room door wide open after having a shower. Another option is to look at installing a ventilation and heat recovery system which extracts the hot air from kitchens and bathrooms through a heat exchanger to warm up fresh air from outside and recycles it back into the house.

Cleaning and Sealing a Slate Tiled Shower room in Lancashire

Cleaning a Ceramic Tiled Shower Cubicle in Silverdale Read More »

Bathroom Grout Colouring After

Lancaster Grout Colouring

Grout Colouring a Ceramic Floor in Lancaster

Here are some details of a small 4m2 Tile Cleaning and Grout Colouring job we did in a shower room in Lancaster. The tiles were recently laid and unfortunately the 5mm wide grout had discoloured because the tiler had used the same bucket to mix the adhesive with and some of the remnants from that had got into the grout mix. If the tiler had used a separate bucket this wouldn’t have happened. The tiler didn’t know what to do to rectify the problem so Tile Doctor got the call. He had done a good job on the rest of the bathroom and the customer didn’t want to upset him over it any further so she was quite happy to pay me to sort the problem out, as long as it didn’t look false.

Ceramic Tiled Bathroom floor before Grout Colouring
Before Grout Colouring

First I cleaned the grout with the pre-treater spray that comes with the kit and washed off the excess with water. Although the directions recommend leaving the grout to dry for 2 hours I left it for 30 minutes followed by a blast from my heat gun to dry any dark wet spots, this speeds up the process immensely.

Applying the Grout Colouring

Next I applied the Grout Colourant, fortunately the tiles were ceramic and the excess grout colourant came off the tiles very easily where I had got some on by accident. The kit came with a special white abrasive cloth which is excellent at removing excess grout colourant from the tiles. I often find unglazed tiles or stone and even some porcelain tiles are slightly porous on the surface and if the grout colourant gets on to these tiles then it can be quite hard to get off. I find it’s always best to do a test first on a couple of rows, if you get any on the tiles, don’t leave it on for more than 10 to 15 minutes as it sets very hard. Porous stones should always be sealed beforehand as it will make them a lot easier to clean. Its worth noting that the Grout Colourant acts as a barrier and so will never need to be sealed, it’s also completely washable.

Bathroom Grout Colouring After
Tiled Ceramic Floor after Grout Colouring

Grout Colouring a Ceramic Tiled Bathroom floor in Lancaster

Lancaster Grout Colouring Read More »

Scroll to Top